coursera-data-engineering
Testing Data Quality with Great Expectations
In this lab, you will work on defining some expectations and validations over a dataset in a MySQL Database. You will implement your validation workflow using the different components of Great Expectations: Data Context, Data Sources, Expectations and suites, and Checkpoints.
Table of Contents
- 1 - Introduction and Setup
- 2 - Data Context
- 3 - Data Source
- 4 - Batch Request
- 5 - Expectation Suite and Validator
- 6 - Creating the Batch Requests and the Validations List
- 7 - Checkpoints and Computing Validations over the Dataset
- 8 - Upload Files for Grading
1 - Introduction and Setup
Great Expectations (GX) enables you to define expectations for your data and to automatically validate your data against these expectations. It can also notify you of any inconsistencies detected, and you can use it to validate your data at any stage of your data pipeline.
1.1. Let’s start by configuring GX. In the Cloud9 or Jupyter terminal, run the following commands to activate your Python environment and then initialize your GX project:
source jupyterlab-venv/bin/activate
great_expectations init
You will be shown an output indicating the folder structure that the library is going to create in your local filesystem, which looks as follows:
great_expectations
|-- great_expectations.yml
    |-- expectations
    |-- checkpoints
    |-- plugins
    |-- .gitignore
    |-- uncommitted
        |-- config_variables.yml
        |-- data_docs
        |-- validations
Type Y to proceed. Even though the output shows great_expectations as the root folder, you will find that the actual root folder is named gx.
Configuring the Backend stores
The previous command initialized the data context object and created your backend stores, such as the checkpoints, expectations, data_docs and validations stores, as local directories. Let’s configure these stores as S3 buckets. For that, you are provided with two S3 buckets:
GXArtifactsS3Bucket: you will use this bucket to store information about your expectations, validations and checkpoints;GXDocsS3Bucket: you will use this bucket to store your DataDocs, which are human readable documentations that contain reports on Expectations, Checkpoints and Validation results.
There are several advantages for storing your project metadata in an S3 bucket. These advantages include:
- Accessibility: S3 buckets are highly accessible from various environments and by other team members or stakeholders.
- Scalability: You can continue storing your project metadata seamlessly as your metadata grows over time.
- Durability: Your metadata are reliably stored and protected.
1.2. Go to the AWS console, and search for CloudFormation; you will see two stacks, one that has an alphanumeric ID and another one with a name starting with aws-cloud9. Click on the stack with the alphanumeric ID and then click on the Outputs tab. In the list of outputs, you will see the buckets with the CloudFormation Key GXArtifactsS3Bucket and GXDocsS3Bucket. You will need to copy the corresponding bucket names, that you can find under the column Value, in order to replace the placeholders below.
1.3. Open the file gx/great_expectations.yml. This YAML file represents the central configuration file used by GX, and contains various settings that control the behavior of your GX project. Search for the stores key; you will find several subkeys associated with each type of store. Replace the sections of the YAML file that correspond to the expectation, validations and checkpoint stores with the following configurations. Make sure to replace the placeholder <GX-ARTIFACTS-BUCKET> with the corresponding bucket name.
Note: the YAML file is indentation-sensitive, so make sure to keep the same indentation level when you replace the configuration information (otherwise you will get some errors when you run the command in 1.5).
- Expectations store:
expectations_store: class_name: ExpectationsStore store_backend: class_name: TupleS3StoreBackend bucket: <GX-ARTIFACTS-BUCKET> prefix: expectations/ - Validations store:
validations_store: class_name: ValidationsStore store_backend: class_name: TupleS3StoreBackend bucket: <GX-ARTIFACTS-BUCKET> prefix: validations/ - Checkpoint store:
checkpoint_store:
  class_name: CheckpointStore
  store_backend:
    class_name: TupleS3StoreBackend
    suppress_store_backend_id: false
    bucket: <GX-ARTIFACTS-BUCKET>
    prefix: checkpoints/
1.4. Now, you will configure the storage for the documentation files Data Docs. In the same YAML file, search for the key data_docs_sites and replace the local_site subkey with the following configuration. Make sure to replace the placeholder <GX-DOCS-BUCKET> with the corresponding bucket name, using the name that is for the docs bucket not the artifacts bucket.
  S3_site:
    class_name: SiteBuilder
    store_backend:
      class_name: TupleS3StoreBackend
      bucket: <GX-DOCS-BUCKET>
    site_index_builder:
      class_name: DefaultSiteIndexBuilder
Save changes in the YAML file Ctrl+S or Cmd+S.
1.5. To check that your stores have been properly configured, execute the following command in the Cloud9 or Jupyter terminal:
great_expectations store list
This command lists the available Stores and shows information such as name, type, and location. Note that the Data Doc Store is not listed by this command.
Note: If you’re using the cloud9 terminal, make sure that you’re in the Python environment you activated when you initialized the GX project. Otherwise the command great_expectations won’t run. If the environment gets deactivated for any reason, you can always re-activate the environment using the same command:
source jupyterlab-venv/bin/activate
1.6. Load the required packages and set the variable LAB_PREFIX that will be used in the lab:
from dotenv import load_dotenv
import boto3
import time
import os
import subprocess

import great_expectations as gx
from great_expectations.checkpoint import Checkpoint
LAB_PREFIX='de-c2w3a1'
Now you will you use the GX components to set up the validation workflow, starting with the Data Context.
2 - Data Context
Thhe data context serves as the entry point for the Great Expectations API, which consists of classes and methods that allow you to create objects to connect to your data sources, create expectations and validate your data. So using the data context, you can connect to the Data source, define your expectations, create a validator, run your checkpoints, and access the metadata of your Great Expectations project. You can read more about the Data Context in the documentation here.
The Data Context can be ephemeral - existing only in memory and not persisting beyond the current Python session - or it can be backed by the configuration files so that it can persist between Python sessions and can be saved for later usage (File Data Context). In this lab, GX was set up so that your data context is a File Data Context backed by an AWS S3 Bucket.
2.1. Use the .get_context() method of great expectations to load your Data Context.
context = gx.get_context()
2.2. Inspect the content of the Data Context that you just created. You will see information about the stores you just configured.
context
{
  "anonymous_usage_statistics": {
    "explicit_url": false,
    "enabled": true,
    "usage_statistics_url": "https://stats.greatexpectations.io/great_expectations/v1/usage_statistics",
    "data_context_id": "01d0c919-a093-43d6-9d17-6e633f2deecd",
    "explicit_id": true
  },
  "checkpoint_store_name": "checkpoint_store",
  "config_variables_file_path": "uncommitted/config_variables.yml",
  "config_version": 3.0,
  "data_docs_sites": {
    "S3_site": {
      "class_name": "SiteBuilder",
      "store_backend": {
        "class_name": "TupleS3StoreBackend",
        "bucket": "de-c2w3a1-613681224218-us-east-1-gx-docs"
      },
      "site_index_builder": {
        "class_name": "DefaultSiteIndexBuilder"
      }
    }
  },
  "datasources": {},
  "evaluation_parameter_store_name": "evaluation_parameter_store",
  "expectations_store_name": "expectations_store",
  "fluent_datasources": {},
  "include_rendered_content": {
    "expectation_suite": false,
    "globally": false,
    "expectation_validation_result": false
  },
  "plugins_directory": "plugins/",
  "stores": {
    "expectations_store": {
      "class_name": "ExpectationsStore",
      "store_backend": {
        "class_name": "TupleS3StoreBackend",
        "bucket": "de-c2w3a1-613681224218-us-east-1-gx-artifacts",
        "prefix": "expectations/"
      }
    },
    "validations_store": {
      "class_name": "ValidationsStore",
      "store_backend": {
        "class_name": "TupleS3StoreBackend",
        "bucket": "de-c2w3a1-613681224218-us-east-1-gx-artifacts",
        "prefix": "validations/"
      }
    },
    "evaluation_parameter_store": {
      "class_name": "EvaluationParameterStore"
    },
    "checkpoint_store": {
      "class_name": "CheckpointStore",
      "store_backend": {
        "class_name": "TupleS3StoreBackend",
        "suppress_store_backend_id": false,
        "bucket": "de-c2w3a1-613681224218-us-east-1-gx-artifacts",
        "prefix": "checkpoints/"
      }
    },
    "profiler_store": {
      "class_name": "ProfilerStore",
      "store_backend": {
        "class_name": "TupleFilesystemStoreBackend",
        "suppress_store_backend_id": true,
        "base_directory": "profilers/"
      }
    }
  },
  "validations_store_name": "validations_store"
}
Additionally, in the content of the Artifacts S3 bucket, you will see a folder for each of the different stores that you have configured, one for the Expectations, another for Validations, and one for Checkpoints.
3 - Data Source
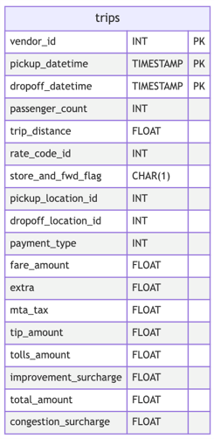
The next step is to configure your Data Source. In this lab, you are provided with a MySQL database labeled as taxi_trips which contains a sample of the TLC trip record data set. The database contains one table named trips, which has the following schema:
3.1. Now that you have a general understanding of the data schema you will use, let’s connect to the database. Using the context object, you can connect to a SQL database using the method: context.sources.add_sql(). This method expects a name for your data source (which can be of your choice) and a connection string that consists of the database credentials that are needed to establish a connection to the database. GX supports passing Data Source connection credentials through environment variables or setting them through the GX configuration files. In this lab, you are already provided with a connection string in the environment variable MYSQL_CONNECTION_STRING, which for your reference takes the following format: "mysql+pymysql://DBUSER:BPASSWORD@DBHOST:DBPORT/DBNAME". You don’t need to define the connection string, it’s already been defined.
Run the following cell to create the data source object.
# Create the data source to represent the data available in the MySQL DB
mysql_datasource = context.sources.add_sql(
    name=f"{LAB_PREFIX}-db-datasource", connection_string="${MYSQL_CONNECTION_STRING}"
)
3.2. Let’s now define a Data Asset from your data source. Remember that a Data Asset represents collections of records stored within a Data Source. It could be a table in a SQL database or a file in a file system. It could be also a query asset that joins data from more than one table or it could be a collection of files matching a particular regular expressions pattern. In other words, by defining your data asset, you tell GX on which part of your data you want to focus on.
Since the given database consists of only the trips table, you will create a Table Data Asset from your data source using the method add_table_asset. This method expects a name for the data asset (in this case, we used the lab prefix followed by the table name) and the actual name of the table in the source database.
Run the following cell to create your data asset.
#В Add a Data Asset to represent a discrete set of data
trips = mysql_datasource.add_table_asset(
    name=f"{LAB_PREFIX}-trips", table_name="trips"
)
4 - Batch Request
The next thing you need to create is the Batch Request, which represents the primary way to retrieve data from your data asset. It can retrieve your data asset as a single batch or as multiple batches. In this lab, you will define your data asset as batches based on the vendor_id column.
Exercise 1
-
To create batches on your Table Data Asset
trips, call the methodadd_splitter_column_value()on your data asset, and pass the"vendor_id"column as the splitter column.Note: GX offers several ways to split your data, according to different conditions.
-
Create the batch request, using the
build_batch_request()method of your Table Data Asset. -
To inspect the batches, get the batches using the
get_batch_list_from_batch_request()method of your Table Data Asset. This method expects as input the batch request. You can inspect the information about each batch, such as the Table Data Asset name, the type of splitter used, and the batch identifier according to the column selected as the splitter.
### START CODE HERE ### (~ 3 lines of code)

# Use the "vendor_id" column as splitter column
trips.add_splitter_column_value("vendor_id")

#В Build the batch request
batch_request = trips.build_batch_request()

# Get the batches
batches = trips.get_batch_list_from_batch_request(batch_request)

### END CODE HERE ###

for batch in batches:
    print(batch.batch_spec)
{'type': 'table', 'data_asset_name': 'de-c2w3a1-trips', 'table_name': 'trips', 'schema_name': None, 'batch_identifiers': {'vendor_id': 1}, 'splitter_method': 'split_on_column_value', 'splitter_kwargs': {'column_name': 'vendor_id'}}
{'type': 'table', 'data_asset_name': 'de-c2w3a1-trips', 'table_name': 'trips', 'schema_name': None, 'batch_identifiers': {'vendor_id': 2}, 'splitter_method': 'split_on_column_value', 'splitter_kwargs': {'column_name': 'vendor_id'}}
{'type': 'table', 'data_asset_name': 'de-c2w3a1-trips', 'table_name': 'trips', 'schema_name': None, 'batch_identifiers': {'vendor_id': 4}, 'splitter_method': 'split_on_column_value', 'splitter_kwargs': {'column_name': 'vendor_id'}}
Expected Output
{'type': 'table', 'data_asset_name': 'de-c2w3a1-trips', 'table_name': 'trips', 'schema_name': None, 'batch_identifiers': {'vendor_id': 1}, 'splitter_method': 'split_on_column_value', 'splitter_kwargs': {'column_name': 'vendor_id'}}
{'type': 'table', 'data_asset_name': 'de-c2w3a1-trips', 'table_name': 'trips', 'schema_name': None, 'batch_identifiers': {'vendor_id': 2}, 'splitter_method': 'split_on_column_value', 'splitter_kwargs': {'column_name': 'vendor_id'}}
{'type': 'table', 'data_asset_name': 'de-c2w3a1-trips', 'table_name': 'trips', 'schema_name': None, 'batch_identifiers': {'vendor_id': 4}, 'splitter_method': 'split_on_column_value', 'splitter_kwargs': {'column_name': 'vendor_id'}}
You can see in the output a key named 'batch_identifiers' with a dictionary as a value. The dictionary contains the splitter column name as a key and the value of the column that identifies the batch. Now, let’s create a batch request list for each of the batches generated before.
batch_request_list = [batch.batch_request for batch in batches]
5 - Expectation Suite and Validator
Expectation Suite
In order to define expectations for your data, you need to create an Expectation Suite which is a collection of expectations or assertions about your data.
Exercise 2
Use the add_or_update_expectation_suite() method of the context object to create a new Expectation Suite. Pass the name stored in the variable expectation_suite_name to the parameter expectation_suite_name in the same method.
#В Add an expectation suite name to the context
expectation_suite_name = f"{LAB_PREFIX}-expectation-suite-trips-taxi-db"

### START CODE HERE ### (~ 1 line of code)

context.add_or_update_expectation_suite(expectation_suite_name=expectation_suite_name)

### END CODE HERE ###
{
  "expectation_suite_name": "de-c2w3a1-expectation-suite-trips-taxi-db",
  "ge_cloud_id": null,
  "expectations": [],
  "data_asset_type": null,
  "meta": {
    "great_expectations_version": "0.18.9"
  }
}
Expected Output
{
  "expectation_suite_name": "de-c2w3a1-expectation-suite-trips-taxi-db",
  "ge_cloud_id": null,
  "expectations": [],
  "data_asset_type": null,
  "meta": {
    "great_expectations_version": "0.18.9"
  }
}
Validator
In GX, a Validator is the component responsible for validating your data against your expectations. You can directly interact with the validator to manually validate your data. OR you can streamline the validation process using checkpoints. For now, let’s directly interact withe the validator to explore the manual process of validating your data.
Exercise 3
Instantiate the validator by calling the get_validator() method of the context object; store it in the validator variable. Make sure to pass the following parameters:
batch_request_listas the list with batch requests you generated previously, which is stored inbatch_request_list.expectation_suite_nameas the Expectation Suite name you used in the previous cell.
### START CODE HERE ### (~ 4 lines of code)

validator = context.get_validator(
    batch_request_list= batch_request_list,
    expectation_suite_name= expectation_suite_name,
)

### END CODE HERE ###
Setting the Expectations
Now you have the expectation suite and the validator objects both ready. But you still did not define any expectations for your data. An Expectation is a statement about your data that can be validated, serving to improve data quality and facilitating clearer communication about data features. Similar to assertions in Python unit tests, Expectations offer a descriptive language for specifying the conditions the data should meet. However, unlike conventional unit tests, GX applies these Expectations directly to your data rather than to code. There are several types of expectations, such as
expect_column_values_to_not_be_nullexpect_column_values_to_be_uniqueexpect_table_row_count_to_be_betweenexpect_column_values_to_be_between
And so on. You will use only a pair of those expectations for this lab. You can also check the Expectations Gallery to see the available expectations depending on the type of Data Source you are using.
Exercise 4
Using the validator, add three expectations:
- First, check that in the dataset, the
"pickup_datetime"does not contain anyNullvalues. Call theexpect_column_values_to_not_be_null()method of thevalidatorand pass the"pickup_datetime"column to thecolumnparameter. - Check that the
"passenger_count"column does not contain nulls. Use the same approach as in the previous step. - Check that the column
"congestion_surcharge"has values between 0 and 1000. Use theexpect_column_values_to_be_between()method to add this expectation.
These expectations will be automatically added to your expectation suite and evaluated on your current Data Asset.
### START CODE HERE ### (~ 3 lines of code)

validator.expect_column_values_to_not_be_null(column="pickup_datetime")
validator.expect_column_values_to_not_be_null(column="passenger_count")
validator.expect_column_values_to_be_between(column="congestion_surcharge", min_value=0, max_value=1000)

### END CODE HERE ###
Calculating Metrics:   0%|          | 0/8 [00:00<?, ?it/s]


Calculating Metrics:   0%|          | 0/8 [00:00<?, ?it/s]


Calculating Metrics:   0%|          | 0/11 [00:00<?, ?it/s]


{
  "success": true,
  "result": {
    "element_count": 96,
    "unexpected_count": 0.0,
    "unexpected_percent": 0.0,
    "partial_unexpected_list": [],
    "missing_count": 0.0,
    "missing_percent": 0.0,
    "unexpected_percent_total": 0.0,
    "unexpected_percent_nonmissing": 0.0
  },
  "meta": {},
  "exception_info": {
    "raised_exception": false,
    "exception_traceback": null,
    "exception_message": null
  }
}
Expected Output
Note: The actual values in the output may change.
{
  "success": true,
  "result": {
    "element_count": 96,
    "unexpected_count": 0.0,
    "unexpected_percent": 0.0,
    "partial_unexpected_list": [],
    "missing_count": 0.0,
    "missing_percent": 0.0,
    "unexpected_percent_total": 0.0,
    "unexpected_percent_nonmissing": 0.0
  },
  "meta": {},
  "exception_info": {
    "raised_exception": false,
    "exception_traceback": null,
    "exception_message": null
  }
}
This corresponds to the output of the last batch that the validator has taken. Don’t worry, GX actually has validated the other batches but only shows the output of the last one.
Run the following cell to save your Expectation Suite to the S3 bucket (expectation store), so you can use the expectations you just defined in another session.
validator.save_expectation_suite(discard_failed_expectations=False)
You can inspect your artifacts bucket. Inside the expectations/ folder you will find a json file named as your Expectation Suite (de-c2w3a1-expectation-suite-trips-taxi-db). If you download it, you will see the expectations you have added, which will look as follows:
{
  "data_asset_type": null,
  "expectation_suite_name": "de-c2w3a1-expectation-suite-trips-taxi-db",
  "expectations": [
    {
      "expectation_type": "expect_column_values_to_not_be_null",
      "kwargs": {
        "column": "pickup_datetime"
      },
      "meta": {}
    },
    {
      "expectation_type": "expect_column_values_to_not_be_null",
      "kwargs": {
        "column": "passenger_count"
      },
      "meta": {}
    },
    {
      "expectation_type": "expect_column_values_to_be_between",
      "kwargs": {
        "column": "congestion_surcharge",
        "max_value": 1000,
        "min_value": 0
      },
      "meta": {}
    }
  ],
  "ge_cloud_id": null,
  "meta": {
    "great_expectations_version": "0.18.9"
  }
}
6 - Creating the Batch Requests and the Validations List
Now in a production environment, you can’t manually validate your data the way you did in the previous exercise. What you can instead do, is to load into your new environment the expectation suite that you stored, and then pass it with your batch requests to a Checkpoint object. The checkpoint will automatically create a validator to validate your data against your expectations.
Optional Notes
You may be wondering why you need to compute the validations independently of the creation of the expectations; some of the advantages of that approach are:
-
Modularity and Reusability: Separating the creation and computation of expectations allows you to modularize your workflow. You can create a set of reusable expectation definitions that can be applied across different batches of your dataset rewriting them each time.
-
Workflow Flexibility: Separating expectation creation and computation provides flexibility in how you orchestrate your data quality pipeline. You can trigger expectation computation based on different events or schedules, integrate it with other data processing steps, or parallelize computations across multiple environments.
-
Resource Optimization: Running and computing expectations may require different computational resources or environments compared to expectation creation. Separating these processes allows you to optimize resource allocation and scale each part of the workflow independently based on its specific requirements.
-
Error Isolation and Debugging: If errors occur during expectation computation, separating the creation process makes it easier to isolate and debug issues. You can focus on troubleshooting the computation step without affecting the expectation definitions themselves.
End of optional Notes
A checkpoint object expects a collection of data batches and their corresponding expectation suite. We will call this collection a validations list. So before you create the checkpoint object, let’s first create the validations list.
First, create a batch request from your Data Asset as you did in Exercise 1. Call the build_batch_request() in your Data Asset and store it in the variable batch_request. Then, create the batches from your Data Asset by using the get_batch_list_from_batch_request() method and passing the batch_request as a parameter.
#В Build the batch request
batch_request = trips.build_batch_request()

#В Create your batches using the batch_request from the previous cell
batches = trips.get_batch_list_from_batch_request(batch_request)
For the expectation suite, run the following cell to retrieve the Expectation Suite’s name from the context object. In this case you only have one expectation suite that you can access from the list of Expectations Suite returned by the list_expectation_suite_names() method.
expectation_suite_name = context.list_expectation_suite_names()[0]
Exercise 5
Let’s now create the validations list. This list consists of a collection of a batch request and expectation suite pairs. In other words, each element in the validations list is a dictionary that defines the batch request and its expectation suite.
To create the validations list, you are given a list comprehension that you will use to iterate over each batch in the batches list. For each batch, define a dictionary with two keys:
"batch_request": use thebatch_requestproperty of the current batch to define the value for this key"expectation_suite_name": use the name of the expectation suite you just retrieved. This value is the same for all elements.
print(batches)
[Batch(datasource=SQLDatasource(type='sql', name='de-c2w3a1-db-datasource', id=None, assets=[TableAsset(name='de-c2w3a1-trips', type='table', id=None, order_by=[], batch_metadata={}, splitter=SplitterColumnValue(column_name='vendor_id', method_name='split_on_column_value'), table_name='trips', schema_name=None)], connection_string=ConfigStr('${MYSQL_CONNECTION_STRING}'), create_temp_table=False, kwargs={}), data_asset=TableAsset(name='de-c2w3a1-trips', type='table', id=None, order_by=[], batch_metadata={}, splitter=SplitterColumnValue(column_name='vendor_id', method_name='split_on_column_value'), table_name='trips', schema_name=None), batch_request=BatchRequest(datasource_name='de-c2w3a1-db-datasource', data_asset_name='de-c2w3a1-trips', options={'vendor_id': 1}, batch_slice=None), data=<great_expectations.execution_engine.sqlalchemy_batch_data.SqlAlchemyBatchData object at 0x7f101cb9c520>, id='de-c2w3a1-db-datasource-de-c2w3a1-trips-vendor_id_1', metadata={'vendor_id': 1}, batch_markers={'ge_load_time': '20240925T041835.031368Z'}, batch_spec={'type': 'table', 'data_asset_name': 'de-c2w3a1-trips', 'table_name': 'trips', 'schema_name': None, 'batch_identifiers': {'vendor_id': 1}, 'splitter_method': 'split_on_column_value', 'splitter_kwargs': {'column_name': 'vendor_id'}}, batch_definition={'datasource_name': 'de-c2w3a1-db-datasource', 'data_connector_name': 'fluent', 'data_asset_name': 'de-c2w3a1-trips', 'batch_identifiers': {'vendor_id': 1}}), Batch(datasource=SQLDatasource(type='sql', name='de-c2w3a1-db-datasource', id=None, assets=[TableAsset(name='de-c2w3a1-trips', type='table', id=None, order_by=[], batch_metadata={}, splitter=SplitterColumnValue(column_name='vendor_id', method_name='split_on_column_value'), table_name='trips', schema_name=None)], connection_string=ConfigStr('${MYSQL_CONNECTION_STRING}'), create_temp_table=False, kwargs={}), data_asset=TableAsset(name='de-c2w3a1-trips', type='table', id=None, order_by=[], batch_metadata={}, splitter=SplitterColumnValue(column_name='vendor_id', method_name='split_on_column_value'), table_name='trips', schema_name=None), batch_request=BatchRequest(datasource_name='de-c2w3a1-db-datasource', data_asset_name='de-c2w3a1-trips', options={'vendor_id': 2}), data=<great_expectations.execution_engine.sqlalchemy_batch_data.SqlAlchemyBatchData object at 0x7f101cb60310>, id='de-c2w3a1-db-datasource-de-c2w3a1-trips-vendor_id_2', metadata={'vendor_id': 2}, batch_markers={'ge_load_time': '20240925T041835.036440Z'}, batch_spec={'type': 'table', 'data_asset_name': 'de-c2w3a1-trips', 'table_name': 'trips', 'schema_name': None, 'batch_identifiers': {'vendor_id': 2}, 'splitter_method': 'split_on_column_value', 'splitter_kwargs': {'column_name': 'vendor_id'}}, batch_definition={'datasource_name': 'de-c2w3a1-db-datasource', 'data_connector_name': 'fluent', 'data_asset_name': 'de-c2w3a1-trips', 'batch_identifiers': {'vendor_id': 2}}), Batch(datasource=SQLDatasource(type='sql', name='de-c2w3a1-db-datasource', id=None, assets=[TableAsset(name='de-c2w3a1-trips', type='table', id=None, order_by=[], batch_metadata={}, splitter=SplitterColumnValue(column_name='vendor_id', method_name='split_on_column_value'), table_name='trips', schema_name=None)], connection_string=ConfigStr('${MYSQL_CONNECTION_STRING}'), create_temp_table=False, kwargs={}), data_asset=TableAsset(name='de-c2w3a1-trips', type='table', id=None, order_by=[], batch_metadata={}, splitter=SplitterColumnValue(column_name='vendor_id', method_name='split_on_column_value'), table_name='trips', schema_name=None), batch_request=BatchRequest(datasource_name='de-c2w3a1-db-datasource', data_asset_name='de-c2w3a1-trips', options={'vendor_id': 4}), data=<great_expectations.execution_engine.sqlalchemy_batch_data.SqlAlchemyBatchData object at 0x7f1020277430>, id='de-c2w3a1-db-datasource-de-c2w3a1-trips-vendor_id_4', metadata={'vendor_id': 4}, batch_markers={'ge_load_time': '20240925T041835.040288Z'}, batch_spec={'type': 'table', 'data_asset_name': 'de-c2w3a1-trips', 'table_name': 'trips', 'schema_name': None, 'batch_identifiers': {'vendor_id': 4}, 'splitter_method': 'split_on_column_value', 'splitter_kwargs': {'column_name': 'vendor_id'}}, batch_definition={'datasource_name': 'de-c2w3a1-db-datasource', 'data_connector_name': 'fluent', 'data_asset_name': 'de-c2w3a1-trips', 'batch_identifiers': {'vendor_id': 4}})]
### START CODE HERE ### (~ 4 lines of code)

validations = [
    {"batch_request": batch.batch_request, "expectation_suite_name": expectation_suite_name}
    for batch in batches
]

### END CODE HERE ###

validations
[{'batch_request': BatchRequest(datasource_name='de-c2w3a1-db-datasource', data_asset_name='de-c2w3a1-trips', options={'vendor_id': 1}, batch_slice=None),
  'expectation_suite_name': 'de-c2w3a1-expectation-suite-trips-taxi-db'},
 {'batch_request': BatchRequest(datasource_name='de-c2w3a1-db-datasource', data_asset_name='de-c2w3a1-trips', options={'vendor_id': 2}),
  'expectation_suite_name': 'de-c2w3a1-expectation-suite-trips-taxi-db'},
 {'batch_request': BatchRequest(datasource_name='de-c2w3a1-db-datasource', data_asset_name='de-c2w3a1-trips', options={'vendor_id': 4}),
  'expectation_suite_name': 'de-c2w3a1-expectation-suite-trips-taxi-db'}]
Expected Output
[{'batch_request': BatchRequest(datasource_name='de-c2w3a1-db-datasource', data_asset_name='de-c2w3a1-trips', options={'vendor_id': 1}),
  'expectation_suite_name': 'de-c2w3a1-expectation-suite-trips-taxi-db'},
 {'batch_request': BatchRequest(datasource_name='de-c2w3a1-db-datasource', data_asset_name='de-c2w3a1-trips', options={'vendor_id': 2}),
  'expectation_suite_name': 'de-c2w3a1-expectation-suite-trips-taxi-db'},
 {'batch_request': BatchRequest(datasource_name='de-c2w3a1-db-datasource', data_asset_name='de-c2w3a1-trips', options={'vendor_id': 4}),
  'expectation_suite_name': 'de-c2w3a1-expectation-suite-trips-taxi-
```db'}]

<a name='7'></a>
## 7 - Checkpoints and Computing Validations over the Dataset

Let's [create a Checkpoint](https://docs.greatexpectations.io/docs/oss/guides/validation/checkpoints/how_to_create_a_new_checkpoint/) to validate the expectations you created over your dataset. Use the `Checkpoint` instantiation and pass the following parameters:

- `name` as the `checkpoint_name` variable. Take a look at how the checkpoint name is created, taking into account the current timestamp. Using a way to differentiate checkpoints will be helpful to avoid overwriting the results of the validation executions
- `data_context`: Use the data context object `context` that you already loaded.
- `expectation_suite_name`: The expectation suite name that you loaded.
- `validations`: Pass the `validations` list that you generated for each of your batch requests.

Take a look at the `action_list` parameter. You will see a list of different [actions](https://docs.greatexpectations.io/docs/reference/learn/terms/action/) that will be performed after the validations are computed. Check the values associated with the `"class_name"` key:

- `StoreValidationResultAction`: This [action](https://docs.greatexpectations.io/docs/reference/api/checkpoint/storevalidationresultaction_class/) stores the validation results in your Validation Store. Remember that this has been set up to be saved in S3.
- `UpdateDataDocsAction`: This [action](https://docs.greatexpectations.io/docs/reference/api/checkpoint/updatedatadocsaction_class/) updates the data docs with the result of the validations.

You can see more Actions in the [documentation](https://docs.greatexpectations.io/docs/reference/learn/terms/action/).


```python
#В Create the Checkpoint configuration that uses your Data Context

timestamp = time.time()
checkpoint_name = f"{LAB_PREFIX}-checkpoint-trips-{timestamp}"

checkpoint = Checkpoint(
    name=checkpoint_name,
    run_name_template="trips %Y-%m-%d %H:%M:%S",
    data_context=context,
    expectation_suite_name=expectation_suite_name,
    validations=validations,
    action_list=[
        {
            "name": "store_validation_result",
            "action": {"class_name": "StoreValidationResultAction"},
        },
        {"name": "update_data_docs", "action": {"class_name": "UpdateDataDocsAction"}},
    ],
)
Exercise 6
Add the created checkpoint to the data context by using the add_or_update_checkpoint() method and passing the checkpoint object that you created.
### START CODE HERE ### (~ 1 line of code)

context.add_or_update_checkpoint(checkpoint=checkpoint)

### END CODE HERE ###
{
  "action_list": [
    {
      "name": "store_validation_result",
      "action": {
        "class_name": "StoreValidationResultAction"
      }
    },
    {
      "name": "update_data_docs",
      "action": {
        "class_name": "UpdateDataDocsAction"
      }
    }
  ],
  "batch_request": {},
  "class_name": "Checkpoint",
  "config_version": 1.0,
  "evaluation_parameters": {},
  "expectation_suite_name": "de-c2w3a1-expectation-suite-trips-taxi-db",
  "module_name": "great_expectations.checkpoint",
  "name": "de-c2w3a1-checkpoint-trips-1727238533.8284037",
  "profilers": [],
  "run_name_template": "trips %Y-%m-%d %H:%M:%S",
  "runtime_configuration": {},
  "validations": [
    {
      "batch_request": {
        "datasource_name": "de-c2w3a1-db-datasource",
        "data_asset_name": "de-c2w3a1-trips",
        "options": {
          "vendor_id": 1
        }
      },
      "expectation_suite_name": "de-c2w3a1-expectation-suite-trips-taxi-db"
    },
    {
      "batch_request": {
        "datasource_name": "de-c2w3a1-db-datasource",
        "data_asset_name": "de-c2w3a1-trips",
        "options": {
          "vendor_id": 2
        }
      },
      "expectation_suite_name": "de-c2w3a1-expectation-suite-trips-taxi-db"
    },
    {
      "batch_request": {
        "datasource_name": "de-c2w3a1-db-datasource",
        "data_asset_name": "de-c2w3a1-trips",
        "options": {
          "vendor_id": 4
        }
      },
      "expectation_suite_name": "de-c2w3a1-expectation-suite-trips-taxi-db"
    }
  ]
}
Expected Output
{
  "action_list": [
    {
      "name": "store_validation_result",
      "action": {
        "class_name": "StoreValidationResultAction"
      }
    },
    {
      "name": "update_data_docs",
      "action": {
        "class_name": "UpdateDataDocsAction"
      }
    }
  ],
  "batch_request": {},
  "class_name": "Checkpoint",
  "config_version": 1.0,
  "evaluation_parameters": {},
  "expectation_suite_name": "de-c2w3a1-expectation-suite-trips-taxi-db",
  "module_name": "great_expectations.checkpoint",
  "name": "de-c2w<TIMESTAMP>ps-1710883980.7753274",
  "profilers": [],
  "run_name_template": "trips %Y-%m-%d %H:%M:%S",
  "runtime_configuration": {},
  "validations": [
    {
      "batch_request": {
        "datasource_name": "de-c2w3a1-db-datasource",
        "data_asset_name": "de-c2w3a1-trips",
        "options": {
          "vendor_id": 1
        }
      },
      "expectation_suite_name": "de-c2w3a1-expectation-suite-trips-taxi-db"
    },
    {
      "batch_request": {
        "datasource_name": "de-c2w3a1-db-datasource",
        "data_asset_name": "de-c2w3a1-trips",
        "options": {
          "vendor_id": 2
        }
      },
      "expectation_suite_name": "de-c2w3a1-expectation-suite-trips-taxi-db"
    },
    {
      "batch_request": {
        "datasource_name": "de-c2w3a1-db-datasource",
        "data_asset_name": "de-c2w3a1-trips",
        "options": {
          "vendor_id": 4
        }
      },
      "expectation_suite_name": "de-c2w3a1-expectation-suite-trips-taxi-db"
    }
  ]
}
Take a look at your Artifacts S3 bucket in the checkpoints/ folder. After this command run, there should be a subfolder with the same name as your checkpoint, like de-c2w3a1-checkpoint-trips-<TIMESTAMP> and inside of it, you will find a YAML file that contains the same configuration that you saw in the previous output:
name: de-c2w3a1-checkpoint-trips-<TIMESTAMP>
config_version: 1.0
template_name:
module_name: great_expectations.checkpoint
class_name: Checkpoint
run_name_template: trips %Y-%m-%d %H:%M:%S
expectation_suite_name: de-c2w3a1-expectation-suite-trips-taxi-db
batch_request: {}
action_list:
  - name: store_validation_result
    action:
      class_name: StoreValidationResultAction
  - name: update_data_docs
    action:
      class_name: UpdateDataDocsAction
evaluation_parameters: {}
runtime_configuration: {}
validations:
  - batch_request:
      datasource_name: de-c2w3a1-db-datasource
      data_asset_name: de-c2w3a1-trips
      options:
        vendor_id: 1
    expectation_suite_name: de-c2w3a1-expectation-suite-trips-taxi-db
  - batch_request:
      datasource_name: de-c2w3a1-db-datasource
      data_asset_name: de-c2w3a1-trips
      options:
        vendor_id: 2
    expectation_suite_name: de-c2w3a1-expectation-suite-trips-taxi-db
  - batch_request:
      datasource_name: de-c2w3a1-db-datasource
      data_asset_name: de-c2w3a1-trips
      options:
        vendor_id: 4
    expectation_suite_name: de-c2w3a1-expectation-suite-trips-taxi-db
profilers: []
ge_cloud_id:
expectation_suite_ge_cloud_id:
Now, it is time to run your validations. Execute the following command to compute the expectations over your dataset. This step can take some time as validations are computed for all batches, so you will see a progress bar showing the computation of the metrics for each of the batches.
checkpoint_result = checkpoint.run()
Calculating Metrics:   0%|          | 0/25 [00:00<?, ?it/s]


Calculating Metrics:   0%|          | 0/25 [00:00<?, ?it/s]


Calculating Metrics:   0%|          | 0/25 [00:00<?, ?it/s]
Once the checkpoint has run the validations, go to your artifacts bucket. Open the validations folder and you will find a folder with the expectation suite name and then a folder named with the same run_time_template format that was set in the checkpoint: trips %Y-%m-%d %H:%M:%S. Open such a folder, inside there will be another subfolder with a Datetime format and finally some json files. The format of the name is composed of the Data Source, Data Asset, and will end with the column name used to perform the splits for the batches and the value for the batch itself. You can download one of them to inspect it.
After your validations have run, remember that the data docs have been updated as part of the actions that are executed as a later process. Run the following command to build your data docs.
context.build_data_docs()
{'S3_site': 'https://s3.amazonaws.com/de-c2w3a1-613681224218-us-east-1-gx-docs/index.html'}
To see the data docs, click on the link in the output.
Note - alternative way to find the URL: This URL can be also found in the properties of the docs S3 bucket. Go to the docs S3 bucket in the AWS console and then click on the Properties tab. Scroll down until you find the Static website hosting section and copy the URL that you will find in that section. Paste it into a new browser tab.
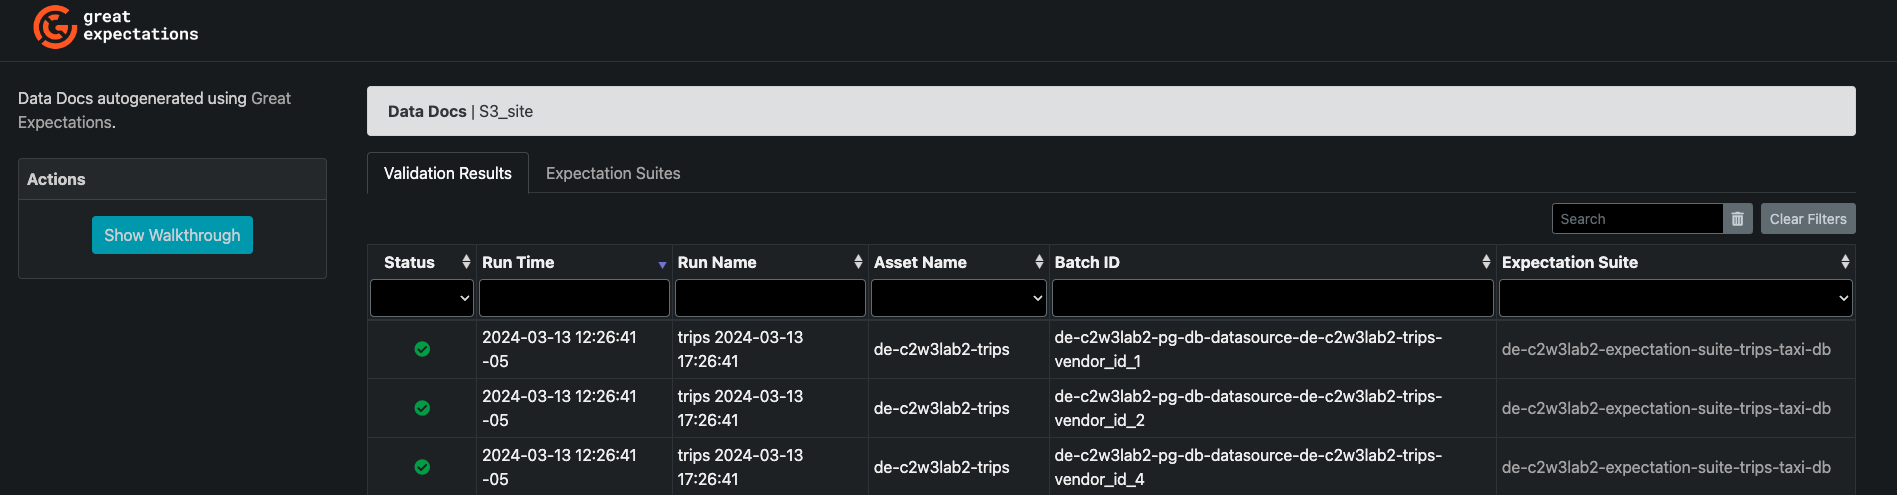
You will be redirected to the validation results which will look like the following image:
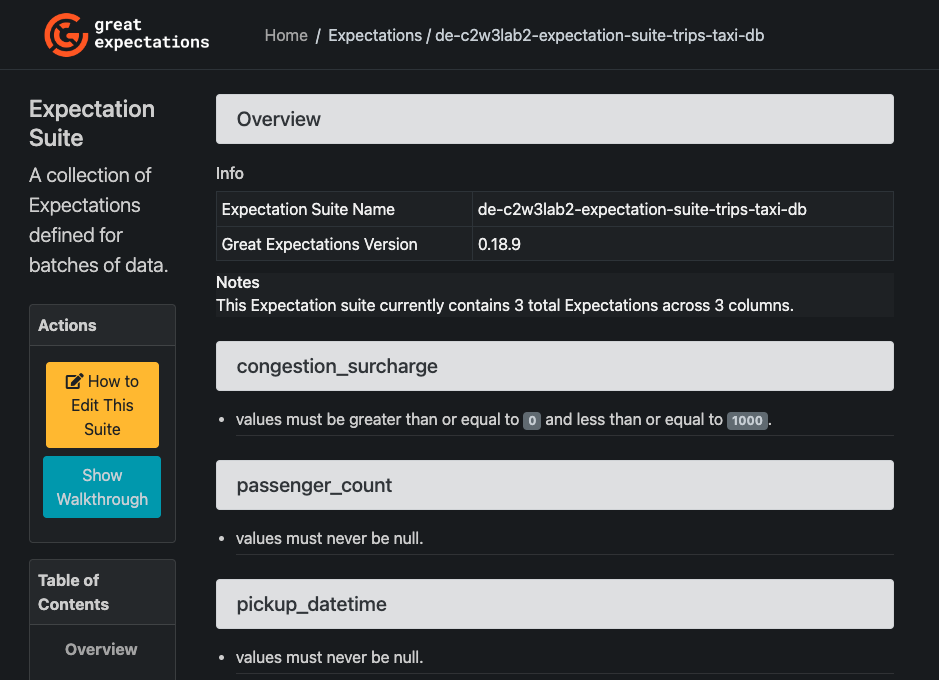
You will have two tabs, one for the Validation Results and another one for the Expectation Suites. If you click the Expectation Suites tab, you will find the Expectation Suite name that you created, click on it and you will find an overview of the expectations that belong to that Suite, such as in the following image:
In the upper part, click on Home and click again on the Validation Results tab. In that tab, you will find the results of the validations performed over each batch. At this point, the Status of all your results should be Succeeded, indicating that all batches passed the proposed data quality expectation checks. Click on any of the rows shown to see a view with the results of the expectations over a particular batch. You should see something similar to this image:
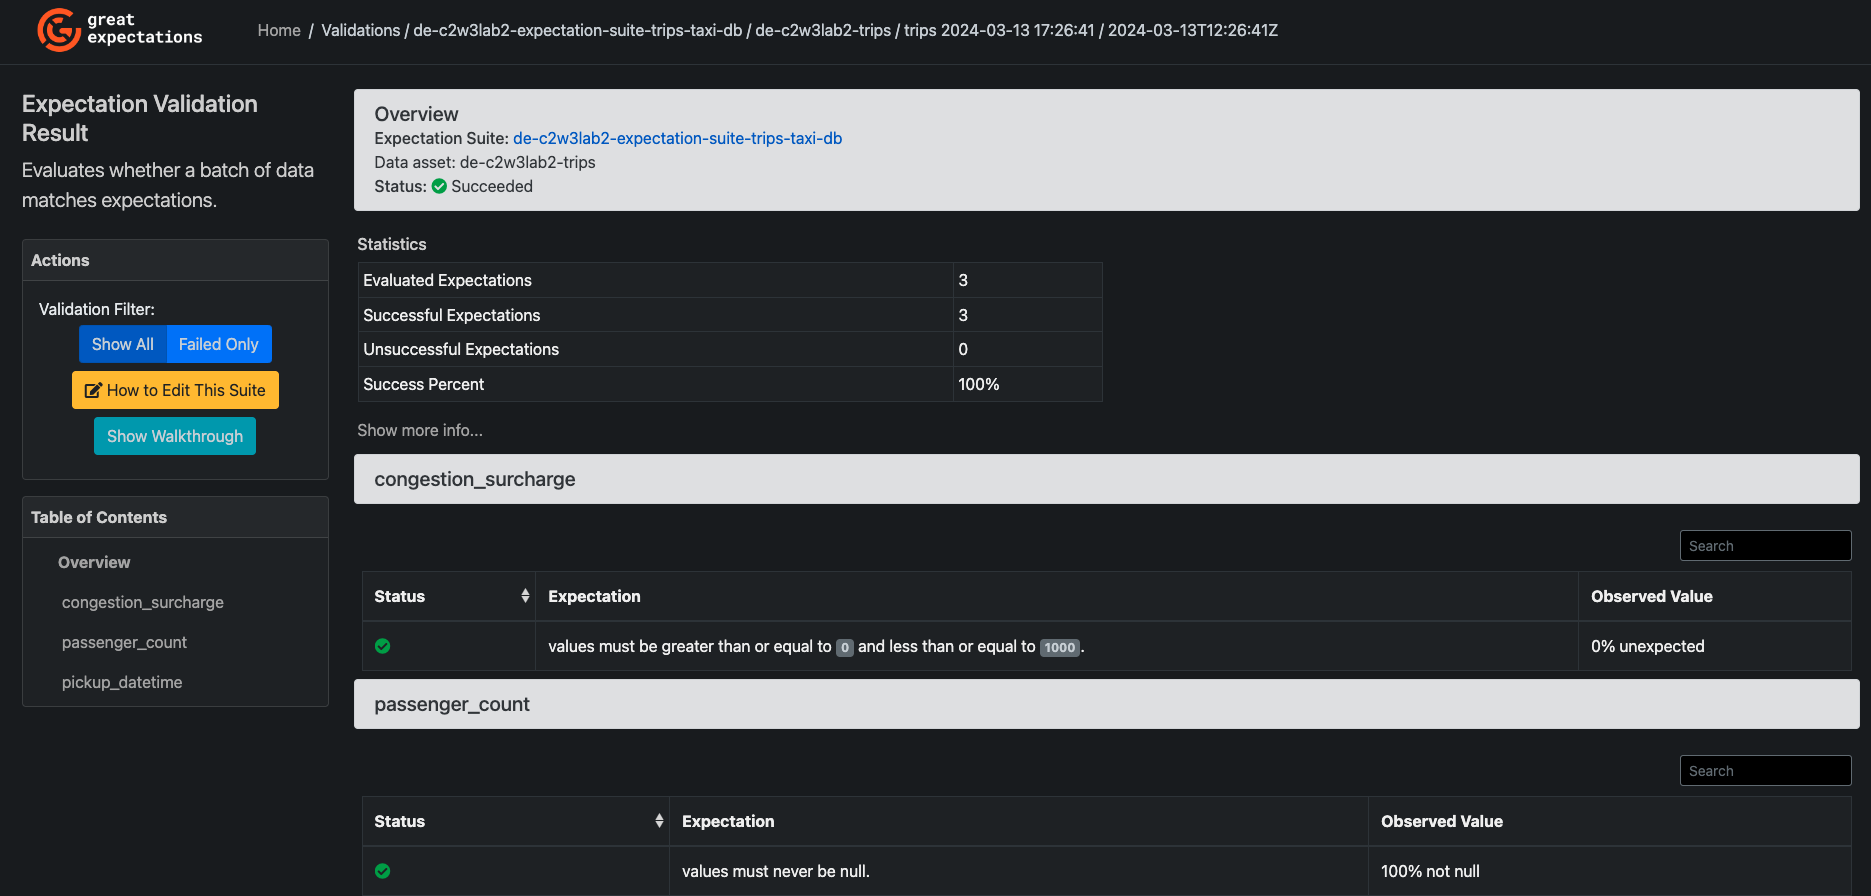
You will find some statistics about the evaluated expectations, and successful and unsuccessful expectations. If you click on Show more info... you will see some metadata about the Checkpoint execution and the batch used. After that section, you will see each of the expectations and the result of the validation of each of them.
Now that you have explored the Data docs and realized that your expectations have run successfully, you will insert some data that violates one of the expectations. Go to the Jupyter or Cloud9 terminal and make sure you are located at /home/ec2-user/environment. Run the command to get the database endpoint:
aws rds describe-db-instances --db-instance-identifier de-c2w3a1-rds --output text --query "DBInstances[].Endpoint.Address"
Then connect to the database replacing the <RDS-DBHOST> with the previous output:
mysql --host=<RDS-DBHOST> --user=admin --port=3306 --password=adminpwrd --database=taxi_trips
Then, use the following command to insert some data that will violate one of the expectations:
INSERT INTO trips (vendor_id, pickup_datetime, dropoff_datetime, passenger_count, trip_distance, rate_code_id, store_and_fwd_flag, pickup_location_id, dropoff_location_id, payment_type, fare_amount, extra, mta_tax, tip_amount, tolls_amount, improvement_surcharge, total_amount, congestion_surcharge)
values (2,'2022-03-11 17:48:59','2022-03-11 18:03:01',6,2.44,1,'N',161,236,2,11.0,0.0,0.5,0.0,0.0,0.3,11.5,1001) ;
Now, back to the notebook, execute again the validation’s computation:
checkpoint_bad_result = checkpoint.run()
Calculating Metrics:   0%|          | 0/25 [00:00<?, ?it/s]


Calculating Metrics:   0%|          | 0/25 [00:00<?, ?it/s]


Calculating Metrics:   0%|          | 0/25 [00:00<?, ?it/s]
Inspect again the Data docs, you will see three additional rows as shown in the image:
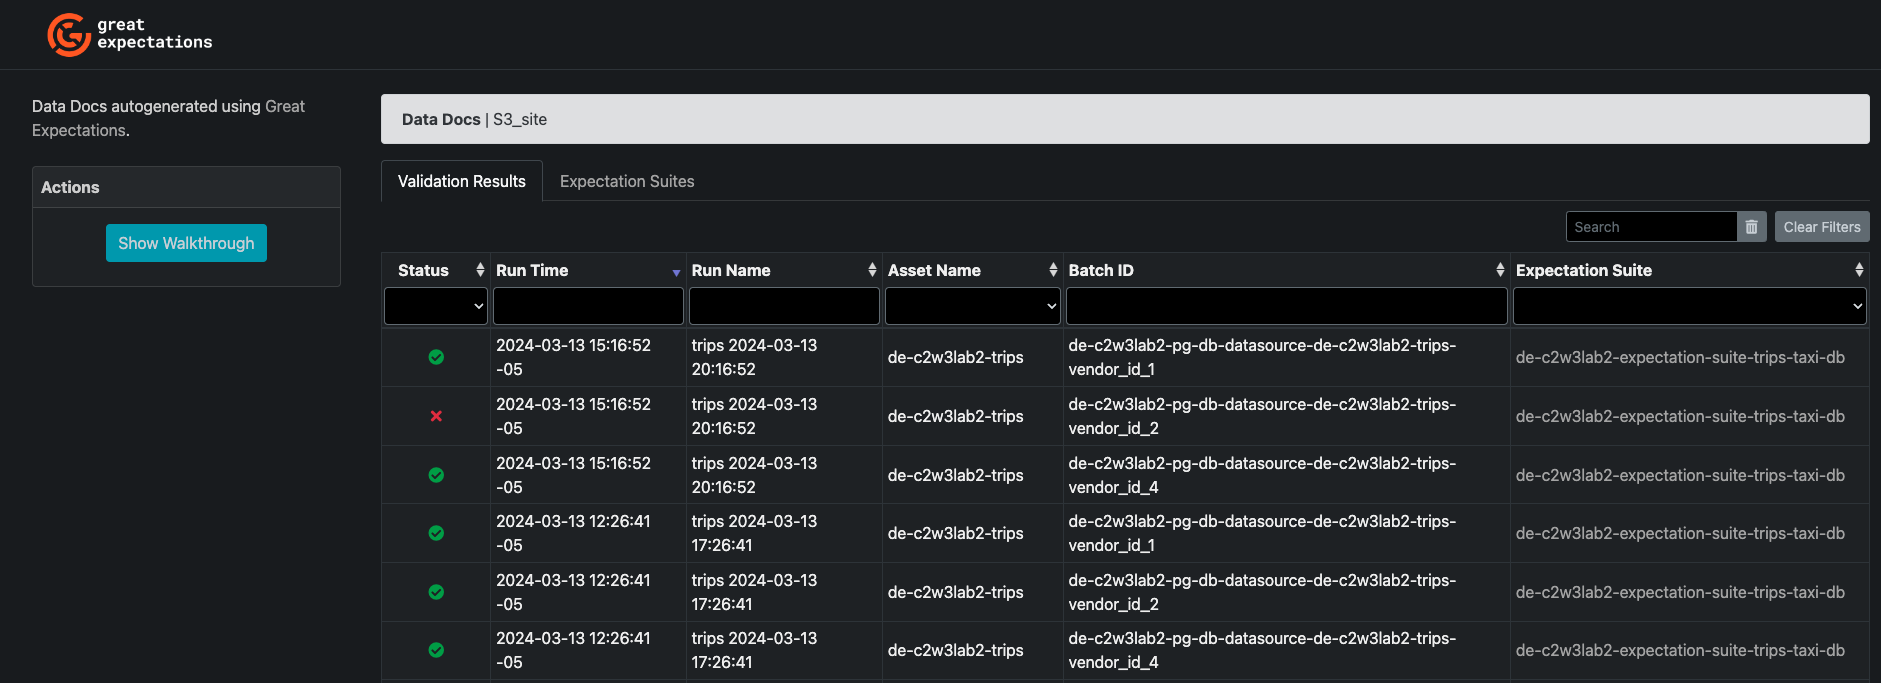
You will see that one of the last 3 batch runs has a Failed Status. Click on it, you will see that the expectation over the column "congestion_surcharge" has failed, as shown in the image:
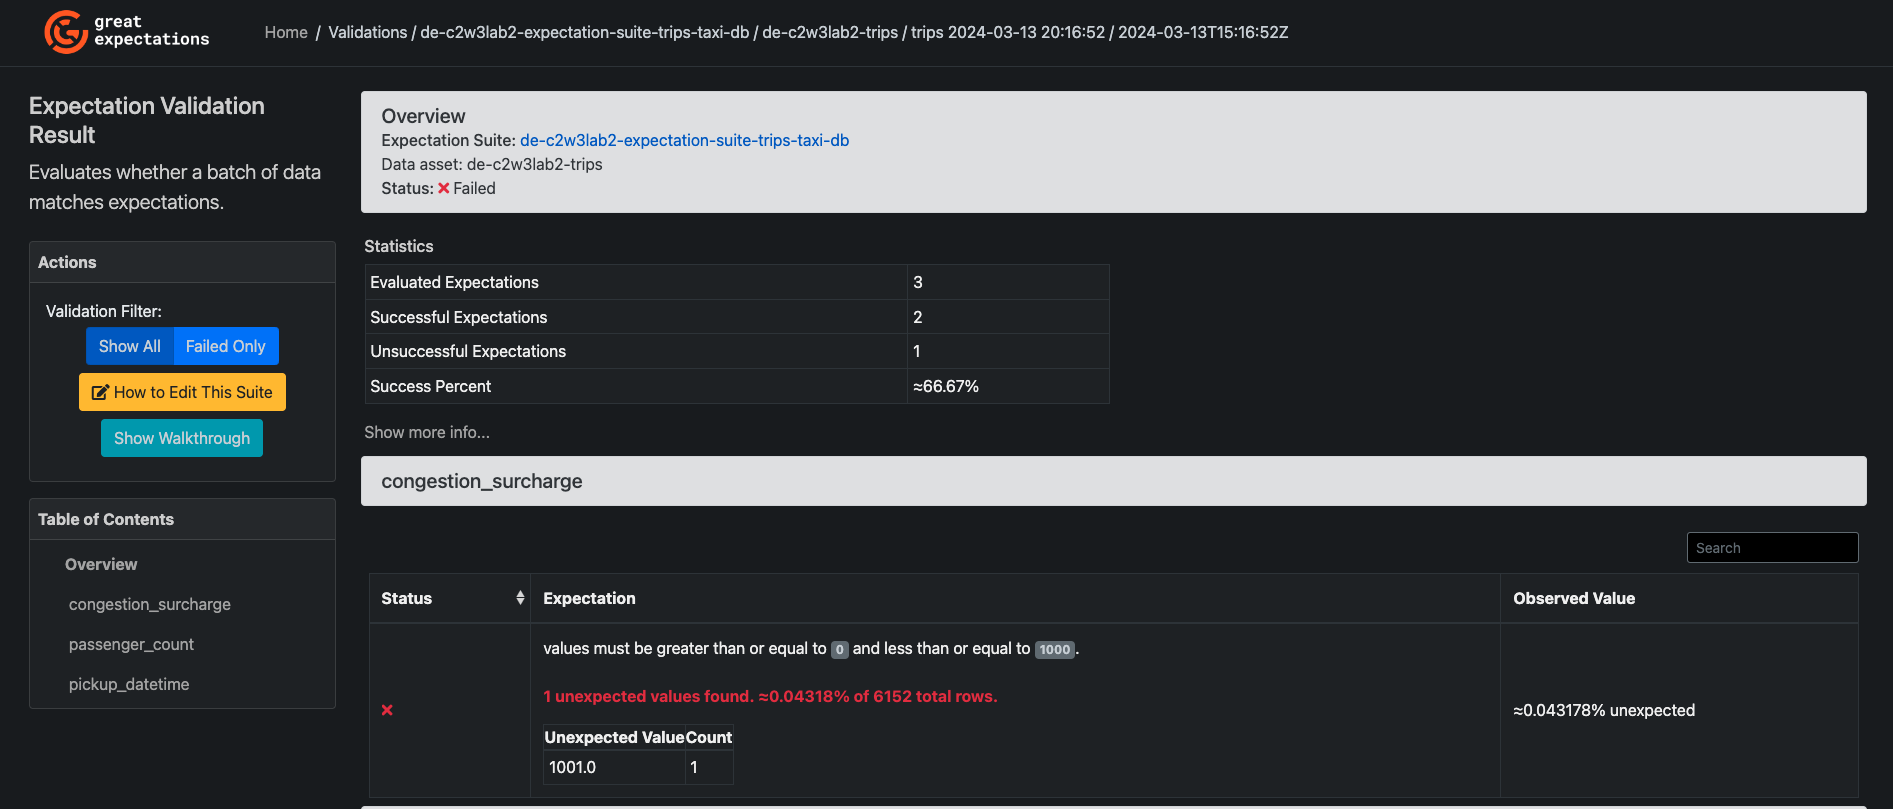
You see the Failed status and that there is 1 Unsuccessful expectation. You can also see that the row of data that you inserted manually has a "congestion_surcharge" value of 1001, which violates your established expectation that the values of that particular column should be between 0 and 1000. The other two expectations were successful. That way, you can assess the quality of your data and the characteristics of those data rows that do not hold the expectations you have set.
In this lab, you worked with some of the core components of GX, configured the Data Context stores by modifying the gx/great_expectations.yml file, and created a SQL Data Source and the corresponding Table Data Asset from which you saw you can create your data batches. Then, you created an Expectation Suite and a Validator and added some Expectations to your Expectation Suite. Then, you created a validation list with the batch requests for each of your data batches and created a GX Checkpoint to run your expectations. Finally, you interacted with the Data Docs stored in your S3 bucket and assessed the quality of your data set.
8 - Upload Files for Grading
Upload the notebook into S3 bucket for grading purposes.
Note: you may need to click Save button before the upload.
# Retrieve the AWS account ID
result = subprocess.run(['aws', 'sts', 'get-caller-identity', '--query', 'Account', '--output', 'text'], capture_output=True, text=True)
AWS_ACCOUNT_ID = result.stdout.strip()

SUBMISSION_BUCKET = f"{LAB_PREFIX}-{AWS_ACCOUNT_ID}-us-east-1-submission"

!aws s3 cp ./C2_W3_Assignment.ipynb s3://$SUBMISSION_BUCKET/C2_W3_Assignment_Learner.ipynb
upload: ./C2_W3_Assignment.ipynb to s3://de-c2w3a1-613681224218-us-east-1-submission/C2_W3_Assignment_Learner.ipynb