coursera-data-engineering
Week 4 Lab 1:
Airflow 101 - Building your First Data Pipeline
In this lab, you will build your first DAG in Airflow using Python operators, visualize it in the Airflow UI and troubleshoot errors in the DAG. You will use a dockerized version of Airflow running on an AWS EC2 instance.
If you get stuck with completing the code in the exercises, you can download the
solution file src_solution/book_of_the_day_solution.py by running the following command
in your Cloud9 environment:
aws s3 cp --recursive s3://dlai-data-engineering/labs/c2w4lab1-233848-solution/ ./
In case your Apache Airflow environment presents any issues, you can always restart it by running the following bash script:
bash ./scripts/restart_airflow.sh
This process will end when the service is healthy. That should take less than 3 minutes.
1 - Introduction
This week, you have learned about the basics of orchestration, what DAGs mean and how to build a simple DAG in Apache Airflow. In this lab, you will implement your first data pipeline in Airflow and interact with its UI.
Assume you work as a Data Engineer at a fictitious company called BookWormSapiens.com, which posts book suggestions and discussions for book lovers and avid readers. You are tasked to develop the Book of the Day feature, where you need to select a random book as the Book of the Day and portray it on the website. To accomplish this task, you will create an Airflow-orchestrated pipeline that uses the Open Library Web APIs (books, authors and covers APIs) to fetch information about a random book, its authors and possibly a thumbnail of its cover. The pipeline will be scheduled to run every day.
2 - The DAG Details
In this lab, you will implement the following DAG:

The DAG consists of the following tasks:
-
start: an empty task marking the start of the DAG. It doesn’t include any behavior. -
get_random_book: sends a request to the Open Library Books API to fetch information about a random book (such as the book title, version and subjects, the keys or identifiers of its authors, and maybe the keys of its cover images). In this task, you will save the returned information to a JSON file labeled asinitial_info_<LOGICAL_DATE>.jsonstored in an S3 bucket. Thelogical_date, in the name of the JSON file, represents the start of the data interval. This file is temporary and will be deleted in thecleanuptask. -
get_authors: uses the authors’ keys stored in theinitial_info_<LOGICAL_DATE>.jsonfile to send the necessary requests to the Open Library Authors API to fetch the names of the authors. In this task, you will save the returned names to a JSON file labeled asauthor_names_<LOGICAL_DATE>.jsonstored in an S3 bucket. This file is also temporary and will be deleted in thecleanuptask. -
get_cover: uses the covers’ identifiers stored in theinitial_info_<LOGICAL_DATE>.jsonfile, to send a request to the Open Library Covers API to retrieve the book’s first available cover image, and save it to thecover_<LOGICAL_DATE>.jpgfile in an S3 bucket. If no covers are available, no file is saved. -
save_final_book_record: uses information from theinitial_info_<LOGICAL_DATE>.jsonandauthor_names_<LOGICAL_DATE>.jsonfiles, and the link tocover_<LOGICAL_DATE>.jpgimage (if it exists), to create the final book record that will be kept to describe the Book of the Day. You will save the final book record to a JSON file labeled asbook_record_<LOGICAL_DATE>.jsonstored in an S3 bucket. -
cleanup: deletes the intermediate files generated by theget_random_bookandget_authorstasks. The intermediate files are no longer needed after the creation of the book record since they contain information about both the book title and its authors’ names. -
end: an empty task marking the end of the DAG. It doesn’t include any behavior.
You will create the start_task and end_task using the
EmptyOperator,
and the rest of the tasks using the
PythonOperator.
Note: For educational purposes, the proposed DAG uses
boto3to interact with S3 and create/delete the necessary files. This is not desirable in real-life Airflow pipelines for the following two reasons:
- Airflow should interact with storage and processing solutions using operators specifically designed for them (you can see the documentation).
- Airflow should only be an orchestrator, and it should delegate the actual processing workload of the pipeline to the appropriate tools such as databases or Spark clusters (Spark operators can be found here).
3 - Setting Up Airflow’s Components
You are provided with a dockerized deployment of Airflow, already running on an EC2 instance. You will only interact with the Airflow UI and the DAG directory, which is an S3 bucket.
3.1. To access your Airflow UI, go to the AWS console and search for
CloudFormation. You will see two stacks deployed, one associated with your
Cloud9 environment (name with prefix aws-cloud9) and another named with an
alphanumeric ID. Click on the alphanumeric ID stack and search for the
Outputs tab. You will see the key AirflowDNS with the complete URL to
access the Airflow UI in the Value column. Copy it and paste it into another
browser tab. You will see a login page, use the following credentials:
- username:
airflow - password:
airflow
Note: It might happen that you won’t see a login screen straight away. As the Airflow’s components deployment can take several minutes, it is possible that the first time you copy the URL, the service will not be yet available. You can continue working on the following exercises in Cloud9 and refresh the Airflow UI tab in a few minutes to see the login screen.
3.2. In this lab, you will interact with two S3 buckets:
- Raw Data Bucket: this is the intermediate storage that you will use to
store the intermediate and final data collected by the pipeline (i.e.,
initial_info_<LOGICAL_DATE>.json,author_names_<LOGICAL_DATE>.jsonandbook_record_<LOGICAL_DATE>.json). - DAGs Bucket: this is the DAG directory that you will use at the end of the lab to upload the Python script defining your DAG. Airflow uses this directory to recognize what DAGs you’ve created and enable you to visualize them in the Airflow UI. Check the names of those two buckets in the CloudFormation Outputs of the deployed stack.
4 - Creating the DAG and its Tasks
To orchestrate the Book of the Day feature that randomly selects a book each
day, you need to create, in a Python script, the Airflow DAG by defining its
tasks using Airflow operators and clarifying their dependencies. The file
src/book_of_the_day.py contains a partially defined DAG that you will complete
in the following exercises.
Open the file src/book_of_the_day.py.
4.1 - Defining the DAG
You first need to define some variables and instantiate your DAG.
Exercise 1
In the book_of_the_day.py file, search for the section associated with the
EXERCISE 1. Complete the code replacing all None following the instructions
in the code. You will need to replace the placeholder <RAW-DATA-BUCKET> with
the name of the Raw Data Bucket. Also, you will set the start_date parameter
to start seven (7) days before the current date. The DAG catchup parameter is
set to True, and choosing for start_date a previous date to the current date,
Airflow will automatically run the DAG several times when you first activate it,
to catch up on the missing runs.
4.2 - Getting the Information of a Random Book
In the first non-empty task of the DAG, you will fetch some initial information
about a random book, by sending a request to the
Open Library Books API. To select
a random book, you will generate a random book ID and include it in the API
request. The Open Library Books API expects the book ID to be between OL10001W
to OL21000000W (Open Library work ID).
The response from the API would look like as follows:
{
  "title": "<BOOK_TITLE>",
  "authors": [
    {
      "author": {
        "key": "/authors/<ID_OF_AUTHOR_1>"
      },
      "type": {
        "key": "/type/author_role"
      }
    },
    {
      "author": {
        "key": "/authors/<ID_OF_AUTHOR_2>"
      },
      "type": {
        "key": "/type/author_role"
      }
    }
  ],
  "covers": ["<ID_OF_COVER_1_AS_INTEGER>", "<ID_OF_COVER_2_AS_INTEGER>"],
  "subjects": ["<SUBJECT_1>", "<SUBJECT_2>"],
  ...
}
You will save this JSON string without any changes to the
initial_info_<LOGICAL_DATE>.json file in the Raw Data Bucket.
Exercise 2
In the section marked as Exercise 2 of the book_of_the_day.py file, complete
the definitions of the get_random_book function and the get_book_task. Go
through the comments in the code to understand the meaning of the code lines.
Then complete the code replacing all None with the correct value, by
following the instructions in each code chunk starting with the comment
### START CODE HERE ### (3 sections). You might find useful the documentation
of the boto3 client method
put_object().
Note: what does the argument
contextthat is passed intoget_random_bookfunction represent? Airflow has a set of built–in variables that contains information about the DAG that is currently running and its environment (like the DAG run’s logical date). This information is stored in a dictionary called Airflow context, and for you to access it, you need to pass it to a task function. Socontextrepresents this dictionary that you can use to access the DAG run’s logical date.
4.3 - Creating a Helper Function
Before you define the next tasks, you’ll need to define a helper function that
downloads the data from the file initial_info_<LOGICAL_DATE>.json that you
have created in the get_random_book task. You will use this helper method in the
subsequent tasks.
Exercise 3
In the section marked as Exercise 3 of the book_of_the_day.py file, complete
the definition of the get_initial_info_dict helper function. Complete the code
replacing all None with the correct value, by following the instructions
in each code chunk starting with the comment ### START CODE HERE ### (2 sections).
4.4 - Getting the Authors’ Names
The initial information you extracted from the book API in the previous task doesn’t include the authors’ names. In this task, you will extract the name(s) of the author(s) of the selected book, by sending the necessary requests to the Open Library Authors API.
The response from the API would look like as follows:
{
  "name": "<AUTHOR_NAME>",
  "birth_date": "<YEAR_OF_BIRTH_AS_INTEGER>",
  ...
}
From this response, you will extract the names of the authors and save them
to the author_names_<LOGICAL_DATE>.json file in the Raw Data Bucket.
You will store the names of the authors as a list as follows:
["<AUTHOR_NAME_1>", "<AUTHOR_NAME_2>", "<AUTHOR_NAME_3>"]
If the book information does not contain any authors, you will save an empty list.
Exercise 4
In the section marked as Exercise 4 of the book_of_the_day.py file, complete
the definitions of the get_author_names function and the get_authors_task
Airflow task. Replace all None with the correct value, by following the
instructions in each code chunk starting with the comment ### START CODE HERE ###
(3 sections).
4.5 - Getting the Cover Image
In this task, you will try to get a cover image of the book and save it to
the Raw Data Bucket. The initial information you extracted from the book API
may include a "covers"key pointing to a list of integers. These integers are
the IDs of the cover images available for the book in the
Open Library Covers API. In this
task, you must make the appropriate call to this API to fetch the image
corresponding to the first listed ID and save it to a file named
cover_<LOGICAL_DATE>.jpg.
Many books in the Open Library database don’t have any associated covers, so
their initial information extracted from the book API won’t include the
"covers" key. In those cases, the task of “getting a cover image” should
not perform any action.
Exercise 5
In the section marked as Exercise 5 of the book_of_the_day.py file, complete
the definitions of the get_cover function and the get_cover_task. Replace
all None following the instructions in each code chunk starting with the
comment ### START CODE HERE ### (3 sections).
4.6 - Saving the Final Book Record
In this task, you will use the information collected in the
initial_info_<LOGICAL_DATE>.json and author_names_<LOGICAL_DATE>.json files
to create the final record that will be kept to describe the Book of the Day.
You will also verify if the cover_<LOGICAL_DATE>.jpg file exists in the
Raw Data Bucket and, if it does, add the path to this image to the information
stored in the final book record. The final record should look like as follows:
{
  "title": "<BOOK_TITLE>",
  "authors": ["<AUTHOR_NAME_1>", "<AUTHOR_NAME_2>"],
  "cover_uri": "gs://<BUCKET_NAME>/cover_<LOGICAL_DATE>.jpg"
}
You will save the final record to a file named
book_record_<LOGICAL_DATE>.json in the Raw Data Bucket.
Exercise 6
In the section marked as Exercise 6 of the book_of_the_day.py file,
complete the definitions of the save_final_book_record function and
the save_final_book_record_task. Replace all None following the instructions
in each code chunk starting with the comment ### START CODE HERE ###
(3 sections).
4.7 - Cleaning Up the Temporary Files
In this task, you will delete the initial_info_<LOGICAL_DATE>.json and
author_names_<LOGICAL_DATE>.json temporary files. They are no longer needed
since the final book record contains the needed information. Note that, if
the cover_<LOGICAL_DATE>.jpg exists, you should not delete it, as the image
itself is not kept in the JSON record and it is useful to portray the Book of
the Day on the website.
Exercise 7
In the section marked as Exercise 7 of the book_of_the_day.py file, complete
the definitions of the clean_up_intermediate_info function and the cleanup_task. Replace all None following the instructions in each code chunk starting with the comment ### START CODE HERE ### (2 sections).
4.8 - Marking the DAG’s End
It is customary to mark the Airflow DAG’s start and end with empty tasks. The
start_task is already defined at the beginning of the task, but you must
define the end_task.
Exercise 8
In the section marked as Exercise 8 of the book_of_the_day.py file, complete
the definitions of the end task using an empty operator and settings for its
ID to "end".
4.9 - Defining the DAG Dependencies
Now that you have defined all the tasks of your DAG, you now need to clarify
their dependencies so that Airflow knows the appropriate order in which to run
the pipeline’s steps. Task dependencies are declared using the >> operator,
with a statement like A >> B meaning that task A should be executed and
finished before starting task B.
You need to define the dependencies among the tasks in such a way that Airflow recognizes the following DAG:
Exercise 9
In the section marked as Exercise 9 of the book_of_the_day.py file, define
the dependencies between the tasks according to the desired DAG.
You will need to use the variable names for the Operator objects
(start_task, get_book_task, etc.). This is described in details in the reading
item “Best Practices in Writing Airflow DAGs” prior to this lab.
5 - Running Your DAG
After you’ve finished all the exercises, you now have your DAG completely
defined in book_of_the_day.py. To upload the book_of_the_day.py file into
the DAG directory DAGs Bucket (notice this is not the same bucket as the
Raw Data Bucket), run the following command (replace <DAGS-BUCKET> with
the name of your DAGs Bucket):
aws s3 sync src s3://<DAGS-BUCKET>/dags
Note: You may be wondering the difference between the
aws s3 cpand theaws s3 synccommands, here are some differences:
- The
aws s3 cpcommand is used to copy individual files or entire directories from a local file system to an S3 bucket, or vice versa. It copies files one time, without considering whether the source or destination files have been modified since the last copy operation.- On the other hand, the
aws s3 syncis used to synchronize the contents of a local directory with an S3 bucket or synchronize between two S3 buckets. It compares the contents of the source and destination and only copies files that are new or have been modified since the last sync operation. It also deletes files in the destination that don’t exist in the source.
After you synchronize your local dags folder with the S3 bucket folder, go to
the Airflow UI, which you opened in the step 3.1. You will see a list of the
available DAGs, currently only one DAG should appear with the book_of_the_day
identifier.
Note: The DAGs list may take up to 5 minutes to refresh. If your DAG has not appear immediately, click on the refresh button on the right-hand side (just right the Autorefresh toggle) every 30 seconds or 1 minute.
You will also see on the left a toggle button to pause/unpause your DAGs.
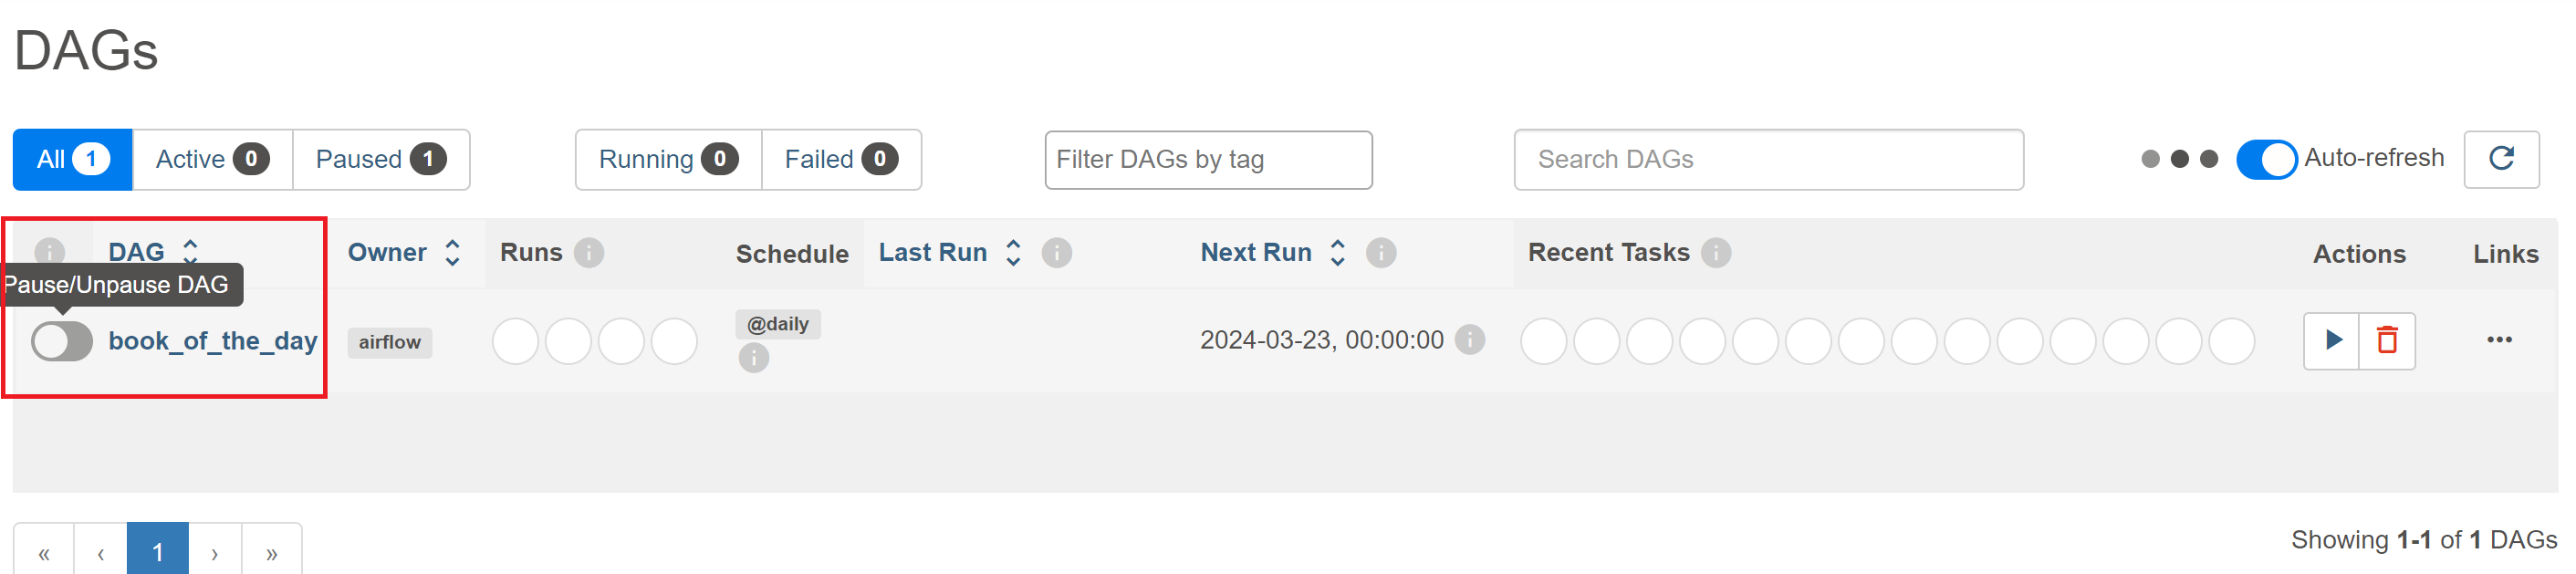
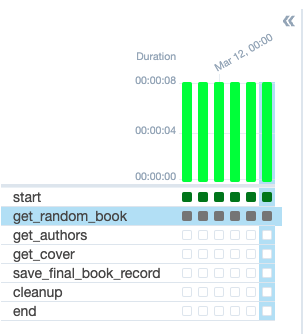
Click on the toggle button to activate your DAG and then click on the DAG ID to go to the Grid view. Since the DAG has a start date in the past, Airflow should start its catchup process and perform the runs of the pipeline corresponding to the last few days. After a few seconds, all the missing runs should have been completed, have they?
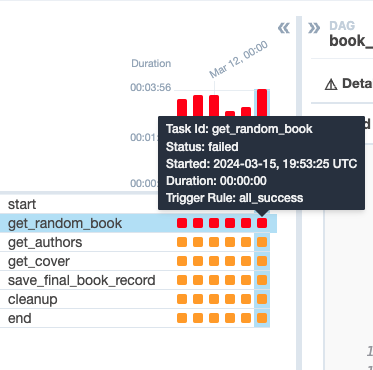
Actually, you will see one of your tasks failing for all the runs. In the Grid view or Graph view, click on the failing task and search for the Logs tab. You will see some retries for the particular task and the logs for each of the attempts. Click on the last attempt’s log and try to understand the issue.
You will see an output similar to this one:
[2024-03-18 23:14:35,760] Exporting env vars: AIRFLOW_CTX_DAG_OWNER='airflow' AIRFLOW_CTX_DAG_ID='learner_book_of_the_day' AIRFLOW_CTX_TASK_ID='get_random_book' AIRFLOW_CTX_EXECUTION_DATE='2024-03-18T23:14:14.039860+00:00' AIRFLOW_CTX_TRY_NUMBER='1' AIRFLOW_CTX_DAG_RUN_ID='manual__2024-03-18T23:14:14.039860+00:00'
[2024-03-18 23:14:35,761] SELECTED BOOK ID: works/OL19043851W
[2024-03-18 23:14:36,102] Task failed with exception
Traceback (most recent call last):
  File "/usr/local/airflow/.local/lib/python3.11/site-packages/airflow/models/taskinstance.py", line 433, in _execute_task
    result = execute_callable(context=context, **execute_callable_kwargs)
             ^^^^^^^^^^^^^^^^^^^^^^^^^^^^^^^^^^^^^^^^^^^^^^^^^^^^^^^^^^^^
  File "/usr/local/airflow/.local/lib/python3.11/site-packages/airflow/operators/python.py", line 199, in execute
    return_value = self.execute_callable()
                   ^^^^^^^^^^^^^^^^^^^^^^^
  File "/usr/local/airflow/.local/lib/python3.11/site-packages/airflow/operators/python.py", line 216, in execute_callable
    return self.python_callable(*self.op_args, **self.op_kwargs)
           ^^^^^^^^^^^^^^^^^^^^^^^^^^^^^^^^^^^^^^^^^^^^^^^^^^^^^
  File "/usr/local/airflow/dags/book_of_the_day_learner.py", line 62, in get_random_book
    assert response.status_code == 200, response.reason
           ^^^^^^^^^^^^^^^^^^^^^^^^^^^
AssertionError: Not Found
The error shows you that the status code of the API response is not 200, in other
words, the requested endpoint was not found (i.e., a 404 status code). This
means that there is an error in the requested URL you used in the get_random_book
function. Open again the book_of_the_day.py file in the Cloud9 editor and
search for the get_random_book function that threw the error. Search for the
line where the API URL is built, it should look like this:
response = requests.get(
            f"https://openlibrary.org/works/{book_id}.json"
        )
You will see that it depends on the book_id, so search for the line where this
variable is defined:
book_id = f"works/OL{random_book_id}W"
From the API’s documentation, here’s an example of a valid API URL:
"https://openlibrary.org/works/OL45804W.json"
You may now realize that the word works appears twice in the URL’s path.
You can delete it from either book_id or from the URL used in the requests.get() method, just remember to keep one of them.
Once you implemented the changes to fix the error, sync again the folder with the S3 DAGs bucket with the command:
aws s3 sync src s3://<DAGS-BUCKET>/dags
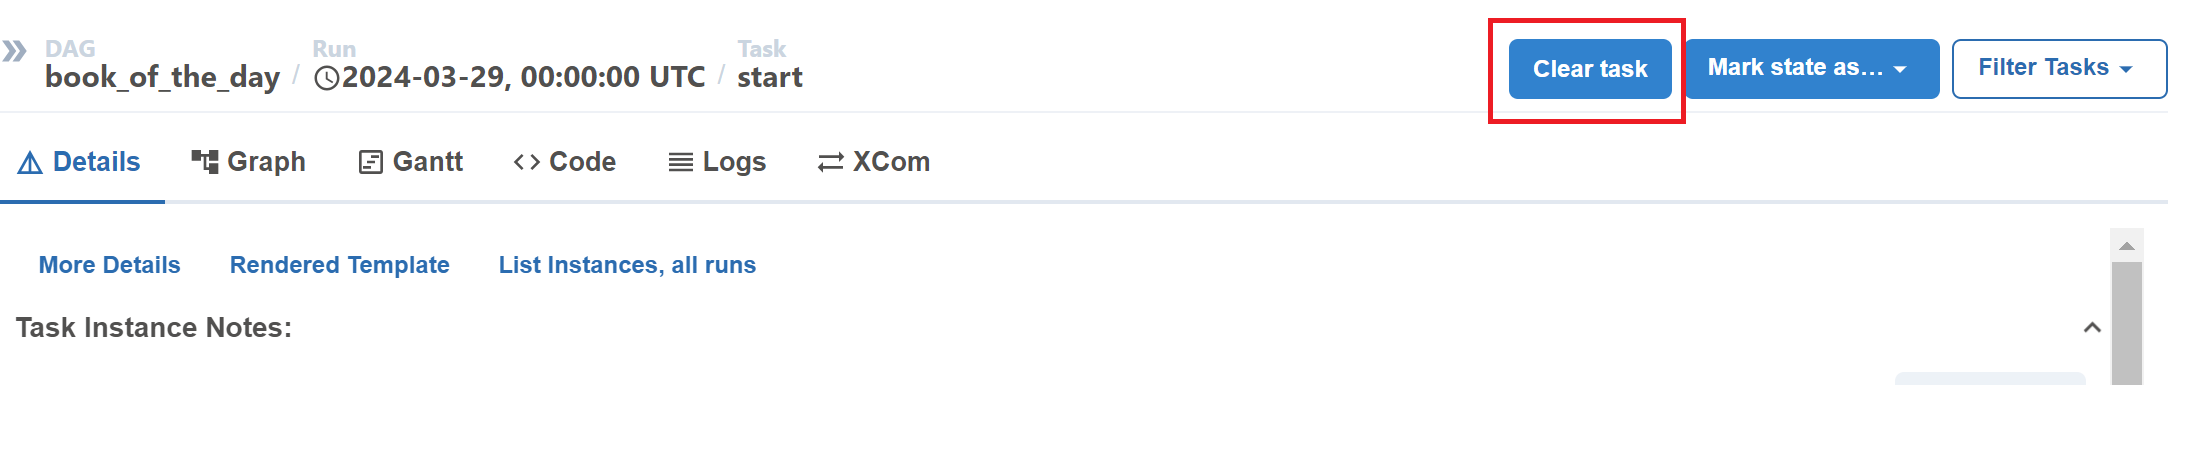
Go back to your Airflow UI and click on the Airflow logo to return to the DAGs list. Click on the refresh button on the right, just above the DAGs list. Click again on your DAG ID and in the Grid view click on the failed task of the last run:
Then click on the Clear task button in the right panel.
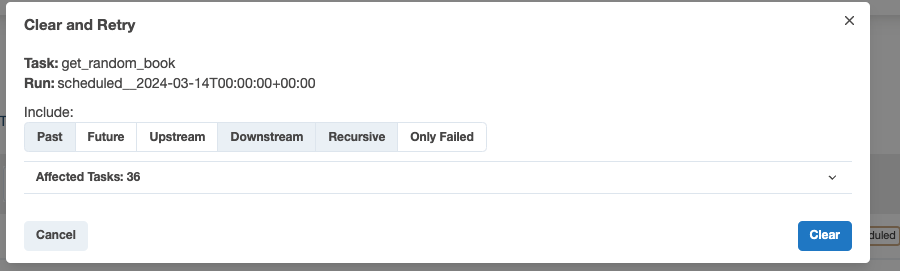
In the pop-up tab, click on Past and you will see that the number of Affected Tasks will increase, meaning that you will run all of those failed tasks. Then click on Clear and all your failed tasks should start running.
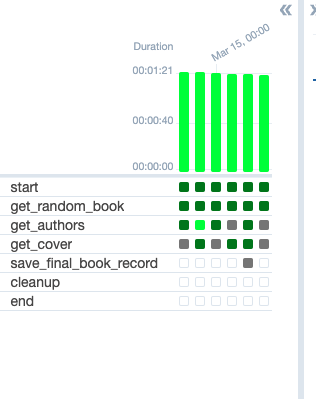
When your tasks are retrying again, the grid view should look like the following:
Now, your DAG runs should run properly. If they didn’t succeed use the logs
to try to find the problem and go back to the book_of_the_day.py file to
correct it.
When you get successful runs, go to the Raw Data Bucket (not the DAGs Bucket)
to see if the appropriate JSON and JPEG files were created. There is a chance
that your DAG ran correctly for every logical date without finding and saving
any cover image. If that’s the case, you can repeat the runs until you get at
least one cover image to make sure the get_cover task is functioning correctly.
In this lab, you have practiced building a DAG in Airflow using its basic operators. You now know how to build, monitor and debug your DAG in Airflow. In the next labs, you will learn more about Airflow operators and its other features, as well as the best practices in writing DAGs in Airflow.