coursera-data-engineering
Week 4 Assignment: Building an Advanced Data Pipeline With Data Quality Checks
This time you will support the Machine Learning team in building a Machine Learning pipeline for three fictitious Mobility-As-A-Service vendors (Alitran, Easy Destiny, and ToMyPlaceAI). This pipeline consists of preprocessing and validating data to train a model to estimate the ride duration and decide if the model is suitable for deployment based on training metrics. The continuous training and evaluation of the model will allow each vendor to improve the ride duration estimation service.
After this assignment you’ll be able to:
- Implement a DAG using Taskflow API.
- Use Great Expectations to perform quality checks in your DAG.
- Employ the
BranchPythonOperatorwithin a DAG to determine the path of the workflow based on a condition. - Construct multiple dynamic DAGs based on configuration files.
1 - The DAG Details
In this assignment, you will implement a DAG to validate data, train and evaluate a model, and decide to deploy it or notify low performance. Then you’ll generalize this DAG as a template to create Dynamic DAGs for different vendors.
This is the DAG diagram which you will be using:
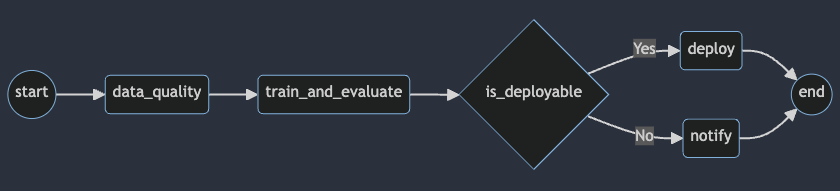
The following are the descriptions of the tasks that constitute the DAG:
start: an empty task marking the start of the DAG. It doesn’t include any behavior.data_quality: triggers a data quality check on the data using the@task.virtualenvdecorator from the TaskFlow API.train_and_evaluate: trains and evaluates a model to estimate ride duration and returns the performance metric.is_deployable: decides whether to deploy a model based on the model performance.deploy: prints a deployment message to simulate the deployment process of the model.notify: prints a notification message to simulate the notification for a low-performance model.end: an empty task marking the end of the DAG. It doesn’t include any behavior and will be executed with theDummyOperator. However, here the default valueall_successof the parametertrigger_rulewill be changed tonone_failed_or_skipped. The rule specifies that the end task should be triggered if at least one upstream task has succeeded. But it’s okay if some upstream tasks fail, as long as not all of them do.
Note: For educational purposes, the proposed DAG uses pandas, SciPy, Great Expectations, and NumPy to handle the data within the Airflow instance. This is not desirable in real-life Airflow pipelines for the following two reasons:
- Airflow should interact with storage and processing solutions using operators specifically designed for them.
- Airflow should only be an orchestrator, and it should delegate the actual processing workload of the pipeline to the appropriate tools such as databases or Spark clusters.
2 - Setting Up Airflow’s Components
You are provided with a dockerized deployment of Airflow, already running on an EC2 instance. You will only interact with the Airflow UI and the DAG directory, which is an S3 bucket.
2.1. To access your Airflow UI, go to the AWS console and search for
CloudFormation. You will see two stacks deployed, one associated with your
Cloud9 environment (name with prefix aws-cloud9) and another named with an
alphanumeric ID. Click on the alphanumeric ID stack and search for the
Outputs tab. You will see the key AirflowDNS with the complete URL to
access the Airflow UI in the Value column. Copy it and paste it into another
browser tab. You will see a login page, use the following credentials:
- username:
airflow - password:
airflow
Note: It might happen that you won’t see a login screen straight away. As the Airflow’s components deployment can take several minutes, it is possible that the first time you copy the URL, the service will not be yet available. You can continue working on the following exercises in Cloud9 and refresh the Airflow UI tab in a few minutes to see the login screen.
2.2. Review the Outputs of the deployed stack in CloudFormation. There are other values you will need for the assignment.
Similarly to the previous lab, you’ll be using Raw Data Bucket to write code, create and delete files, and DAGs Bucket to upload the file defining the DAG (which will be recognized by Airflow). Check the names of those two buckets in the CloudFormation Outputs.
In case your Apache Airflow environment presents any issues, you can always restart it by running the following bash script:
bash ./scripts/restart_airflow.sh
This process will end when the service is healthy. That should take less than 3 minutes.
3 - Preprocessing the Data
The first task in any Machine Learning pipeline is to preprocess the data. In this assignment, the data has been already preprocessed and partitioned by the vendor name and then divided into train and test sets as parquet files. Right now, you count on the train and test splits to build an ML model in your Work Zone of the Raw Data Bucket.
3.1. In your Cloud9 environment, check the data folder. There you will see the
following structure
"work_zone/data_science_project/datasets/<VENDOR_NAME>/train.parquet""work_zone/data_science_project/datasets/<VENDOR_NAME>/test.parquet"
Where the placeholder <VENDOR_NAME> can be any of the following values:
easy_destinyalitranto_my_place_ai
3.2. This is the data that the ML team provided you. You need to store it in the
Raw Data Bucket. For that, in the Cloud9 terminal change your working directory
to data and execute the aws s3 sync command replacing the placeholder
<RAW-DATA-BUCKET> with the Raw Data Bucket name (see the Value column in the
CloudFormation). Then go back to the original directory.
cd data
aws s3 sync work_zone s3://<RAW-DATA-BUCKET>/work_zone/
cd ..
3.3. Inspect your bucket with the following command (please, replace the placeholder
<RAW-DATA-BUCKET> with the Raw Data Bucket name):
aws s3 ls s3://<RAW-DATA-BUCKET>/work_zone/ --recursive
Now you will need to create a data pipeline that will perform some quality checks and then train a custom model for each vendor because each one operates in a different country and has particular quality requirements.
4 - Creating the DAG and its Tasks
4.1 - Checking Data Quality
Data quality is the measure of the suitability of data to be used for its intended purpose. It is usually thought of as comprising several dimensions, with the most common being:
-
Accuracy: The level to which data reflects the real-world scenarios and events and can be confirmed through verifiable sources.
-
Completeness: The degree to which the data carry all of the desired information.
-
Consistency: The absence of conflicts between versions of the same data stored in different locations.
-
Validity: Adherence of the data to an expected set of rules, which may come from physical, mathematical, statistical, or business-related restrictions.
-
Uniqueness: The absence of duplicate or overlapping values within a single copy of the data.
-
Timeliness: The ability to have the data available and sufficiently up-to-date when it is to be used.
A tool that allows you to solve these problems is Great Expectations (GX), which was covered in Week 3 of this Course.
The business establishes that no vendor can report services to more than 6
passengers in a single trip, so you should not train a model if the data does not
meet this criterion. The validation can be done on the passenger_count column
of the data using the
GreatExpectationsOperator.
You will need to complete the Python scripts which can be found in the folder
src/. At the end of the assignment, you’ll upload the files to the appropriate
bucket so that you can run your DAG with the Airflow UI.
Open the file src/model_trip_duration_easy_destiny.py. The script defines the DAG
you’ll use to orchestrate the continuous training pipeline.
Exercise 1
- Create a variable from the Airflow UI. Select the Admin tab in the
header, select the Variables option. Click the add button + and complete
the variable with the following values:
Key:bucket_name,Val: name of the Raw Data Bucket.
Click on Save.
- Complete the definition of the
GreatExpectationsOperatorin the section associated with theEXERCISE 1. You will need to specify the asset name for the check, execution engine and some other parameters. You can explore the expectation suite in the filedags/gx/expectations/de-c2w4a1-expectation-suite.jsonof the DAGs Bucket.
4.2 - Training and Evaluating the ML Model
You already have a task that allows you to assess data quality. Now you will create one to trigger a training and evaluation process. For that, you will use the TaskFlow API.
You will train a linear regression model to predict the trip duration in a ride service. Then measure its error using the root-mean-square error (RMSE) on the test data. Finally, you will configure this task to return the model performance. This performance will be critical for downstream tasks in the pipeline.
In this assignment, the Airflow instance will compute the training process. Remember that Airflow is an orchestrator, and high-load tasks like this one must run into other machines to trigger them with Airflow.
Exercise 2
Complete the train_and_evaluate task in the section associated with the
EXERCISE 2. Then complete the code by following the instructions in each code
chunk starting with the comment ### START CODE HERE ###` (2 sections). This task
will
- Read the train and test splits for Easy Destiny (
easy_destiny) based on the input parametervendor_name. - Return the RMSE
performanceto be used by the next task.
4.3 - Branching the ML Model
There might be scenarios where you need certain tasks in a data pipeline to run conditionally; that is, they would or would not be executed depending on whether some particular conditions are met. This behavior can be achieved in Apache Airflow with branching, which can make a pipeline follow only certain paths of the DAG while omitting others.
Branching is performed in Airflow through the
BranchPythonOperator.
It is similar to the PythonOperator, but the Python callable it refers to must
return a specific task ID or a list of task IDs indicating which of the directly
dependent tasks will be executed. Any tasks that are directly downstream but
whose IDs are not returned by the Python function will be skipped.
Exercise 3
Complete the section associated with the EXERCISE 3 in the file
src/model_trip_duration_easy_destiny.py. You will need to define the function
_is_deployable and use it in the is_deployable.
4.4 - Defining the DAG Dependencies
Let’s define our task dependencies. Remember task dependencies are declared using
the >> operator, with a statement like A >> B meaning that task A should
be executed and finished before starting task B. But if you are using the
TaskFlow API, this is a little different. For instance, if you have task A
with one input parameter name having a default value of martin and
and the task B without any input parameter, you must define dependencies in
this way A(name="martin") >> B().
Exercise 4
In the src/model_trip_duration_easy_destiny.py file complete the section
associated with the EXERCISE 4. You will need to declare the dependencies to
replicate the desired DAG using previously defined tasks and operators. Make
sure that you use the task names, not the method names (e.g. is_deployable_task,
not _is_deployable).
5 - Dynamic DAGs
You may remember the DRY principle of software development. It stands for “don’t repeat yourself”, and it reminds us that we should strive to avoid code repetition as it makes software harder to maintain and more susceptible to the introduction of bugs. Since you declare the data pipelines as code, the same principle applies to Airflow DAGs. However, it is not uncommon to encounter the necessity of having DAGs for very similar pipelines that vary only in a few inputs or parameters. In these cases, instead of writing one DAG for each pipeline and having a lot of repeated code, you should harness the power of dynamic DAGs so that you can generate multiple similar DAGs from just a couple of code files and possibly some configuration files with no duplicate code.
There are several ways to generate DAGs dynamically. The one you will use here employs the Jinja library to replace some placeholders in a template DAG to generate DAGs according to the parameters specified in JSON configuration files. Jinja is the same templating engine used by Airflow for other purposes.
5.1 - Creating the Template File
You need to have DAGs for To My Place AI and Alitran that will be very similar to the one you wrote for Easy Destiny. This is a good use case for dynamically generated DAGs, so you will turn the DAG you wrote into a Jinja template that can work for any of the three vendors when replacing the appropriate placeholders.
5.1.1. Copy the contents of the file src/model_trip_duration_easy_destiny.py
into a new file src/templates/template.py. You can use the following
command:
cp src/model_trip_duration_easy_destiny.py src/templates/template.py
5.1.2. In the template.py file replace each occurrence of the DAG name
model_trip_duration_easy_destiny with the Jinja template: ``
(it should be done in 3 places in the code). It doesn’t matter if it’s a function name or
even a string, using Jinja you will be able to add the correct name.
5.1.3. Replace each occurrence of the vendor name easy_destiny in the DAG with the
Jinja template `` (it should be done in 4 places in the code).
You created the template based on the script from the previous exercises. The only differences for each of the three vendors are the DAG name and vendor name.
5.2 - Creating the configuration files
The configuration files are the sources to generate the new DAGs based on the
template. Each new config file will represent the variables of a single new DAG
by defining key-value pairs for each of the template variables. Therefore,
you will end up with as many config files as Dynamic DAGs you want to create and
as many key-value pairs as dynamic template variables (``). In this
case, you have to create a dag for each of our 3 vendors
(easy_destiny, alitran, and to_my_place_ai).
5.2.1. In the Cloud9 terminal, create the following folder:
mkdir -p src/templates/dag_configs
5.2.2. In the folder src/templates/dag_configs create three configuration files
called config_easy_destiny.json, config_alitran.json and
config_to_my_place_ai.json.
5.2.3. Copy and paste the following JSON data into each of the files,
replacing the placeholder <VENDOR_NAME> with the appropriate vendor
(easy_destiny, alitran or to_my_place_ai)
{
  "dag_name": "model_trip_duration_<VENDOR_NAME>",
  "vendor_name": "<VENDOR_NAME>"
}
5.3 - Generating the DAGs
Now that you have the template and the configuration files, you will need to
produce the Dynamic DAGs by creating and running a script to do it.
The script called generate_dags.py allows you to produce the DAG files
using the template.py and configs. Open the generate_dags.py that is also
located in the src/templates folder.
As you can see, the script reads the template.py, then detects each JSON
configuration that matches the pattern config_*.json to iterate over them.
On every iteration, the generator reads one config file and attempts to replace
all Jinja expressions in the template script. However, each of the config file
only defined two of the Jinja expressions - vendor_name and dag_name,
while the others, such as `` are not defined in the
config file and are expected to be replaced at the runtime of the DAG. The
generator will skip those expressions wrapping them like
{{ var.value.bucket_name }}, which can be considered as
protection of the expressions not defined in the config file. After that
the iteration block declares the filename "dags/{config['dag_name']}.py"
using the dag_name parameter, renders the template_str in content and writes
or overwrites the content as a new file.
5.3.1. In the Cloud9 terminal, go to the src/templates folder:
cd src/templates
5.3.2. Generate the dynamic dags by running the file generate_dags.py with the command:
python3 ./generate_dags.py
The three dags will be generated in the src/dags/ folder.
5.3.3. Get back to the environmental folder:
cd ../..
6 - Running the DAGs with Airflow
Synchronize the src/dags folder with the DAGs Bucket name by using
the following command. The DAGs Bucket name can be found in the Value column
of CloudFormation outputs:
aws s3 sync src/dags s3://<DAGS-BUCKET>/dags
Once the DAGs are copied to your DAGs Bucket, go to the Airflow UI. Refresh the web interface, you should see that it recognizes the three DAGs (it may take from 2 to 10 minutes). Click on the toggle button and let each dag run. These are the expected results for each dag id:
- model_trip_duration_alitran: it will notify the model was not deployed.
- model_trip_duration_easy_destiny: it will deploy the model.
- model_trip_duration_to_my_place_ai: it will fail the checkpoint in Great Expectations.
Note: It is suggested to run these dags one by one as the Great Expectations task requires to access the documentation’s files, and if all dags try to do it at the same time may they may incur in some unnecessary retries for this task.
If the tasks didn’t succeed, use the logs to find the
problem and return to the template.py script to correct and rebuild the dynamic DAGs.
Note: The DAG
model_trip_duration_to_my_place_aiwill “fail successfully”, because the data will not pass the data quality check.
If your runs didn’t succeed the first time, in the practice labs of this week you can find some instructions on how to detect the source of the problem. If you have updated the code and want to restart the DAGs, go to Airflow’s web interface and navigate to the Browse > DAG Runs page. There you can delete the failed runs so that Airflow performs them again.
In this assignment, you built an advanced data pipeline and automated
quality assurance processes with Apache Airflow and Great Expectations.
You created a pipeline for the continuous training, evaluation and
deployment of a Machine Learning model, configured a GreatExpectationsOperator
to assess data quality. Afterwards, you performed branching operations based on the
model performance to decide whether to deploy the model or notify about low
performance. And finally, you created Dynamic DAGs to manage data pipelines
for different vendors following the DRY principle.