coursera-data-engineering
Data Modeling with DBT
During this week’s assignment, you will learn how to model a dataset based on two multi-dimensional data models such as the Star Schema and One Big Table (OBT).
Table of Contents
- 1 - Introduction and Setup
- 2 - Modeling
- 3 - Star Schema
- 3.1 - Description of the Approach
- 3.2 - Creating the Facts Table
- 3.3 - Creating the Customers Dimension Table
- 3.4 - Creating the Employees Dimension Table
- 3.5 - Creating the Office Dimension Table
- 3.6 - Creating the Product Dimension Table
- 3.7 - Creating the Date Dimension Table
- 3.8 - Running the Star Schema Model
- 4 - One Big Table (OBT)
- 5 - Performing Tests over the Data in the New Models
- 6 - Upload Files for Grading
Please, load the required SQL model.
%load_ext sql

LAB_PREFIX='de-c4w1a1'
1 - Introduction and Setup
Data modeling is one of the pillars of Data Engineering, it involves organizing bits of data into defined models with their respective data types and relationships between each other. Most of the work in data modeling involves using predefined techniques or patterns on a raw dataset based on the business’s requirements. Data models like the Star Schema and One Big Table (OBT) have become popular for analytical workloads in recent years. In this lab, you will apply these models to the classicmodels dataset.
1.1 - Initiating dbt 101 Project
dbt is a transformation workflow command line tool based on SQL, it consists of a compiler and a runner. A user writes dbt files and then can invoke dbt to run these files on the data warehouse of their choice. The compiler converts the dbt files into raw SQL scripts and runs them for you.
Let’s start a dbt project.
Note: All terminal commands in this lab should be run in the Cloud9 terminal, not Jupyter, as it may cause some issues.
1.1.1. Activate the Python virtual environment for the lab. Run the following command in the Cloud9 terminal:
source lab-venv/bin/activate
1.1.2. Check that dbt Core is installed.
dbt --version
1.1.3. Initiate the classicmodels_modeling project with the init command:
dbt init classicmodels_modeling
Select the postgres database by pressing 1 and then Enter when prompted to. After that you will be prompted to enter other values, but you should quit that with Cmd + C or Ctrl + C as you will configure the rest of the connection details later. Check that the folder classicmodels_modeling will be created.
1.1.4. You need to reactivate the Python virtual environment again with the command
source lab-venv/bin/activate
1.1.5. Copy the packages.yml file to the project folder:
cp ./scripts/packages.yml ./classicmodels_modeling/
1.1.6. Navigate into your project’s directory:
cd classicmodels_modeling
1.1.7. Run the following command from the classicmodels_modeling folder to fetch the latest stable versions of tools and libraries specified in the packages.yml file.
dbt deps
1.1.8. Open the main configuration file for the project ./classicmodels_modeling/dbt_project.yml. Go through the comments in that file to understand its content.
1.2 - Source Configuration
When developing with dbt Core, dbt connects to your data warehouse using a profile, which is a YAML file with all the connection details to your warehouse. You are going to use a Postgres database.
1.2.1. Go to CloudFormation in the AWS console. You will see two stacks deployed, one associated with your Cloud9 environment (name with prefix aws-cloud9) and another named with an alphanumeric ID. Click on the alphanumeric ID stack and search for the Outputs tab. You will see the key PostgresEndpoint, copy the corresponding Value.
1.2.2. Open the file located at ./scripts/profiles.yml. Replace the placeholders <DATABASE_ENDPOINT> with the endpoint value. Save changes.
1.2.3. Assuming you are already inside the classicmodels_modeling folder in the terminal, run the following command to copy the profiles.yml file to the invisible folder .dbt of the project:
cp ../scripts/profiles.yml ~/.dbt/profiles.yml
1.2.4. Test the connection with the following command:
dbt debug
It should return a Connection test: OK connection ok at the end of the output.
1.2.5. Load the connection configuration into the notebook with the following cell:
import yaml

with open("./scripts/profiles.yml", 'r') as stream:
    data_loaded = yaml.safe_load(stream)

DBCONFIG = data_loaded["classicmodels_modeling"]["outputs"]["dev"]
DBHOST = DBCONFIG["host"]
DBPORT = int(DBCONFIG["port"])
DBNAME = DBCONFIG["dbname"]
DBUSER = DBCONFIG["user"]
DBPASSWORD = DBCONFIG["password"]
db_connection_url = f'postgresql+psycopg2://{DBUSER}:{DBPASSWORD}@{DBHOST}:{DBPORT}/{DBNAME}'

%sql {db_connection_url}
2 - Modeling
Inside the classicmodels_modeling project folder, you have the models folder, which contains an example of a model definition. Let’s explore it.
2.1. Open ./classicmodels_modeling/models/example/schema.yml file and go through its contents. The file contains a version in the header and then a list of models. For each model, you will need to give a name, a description and a list of columns. For each column, you can also add a description and some tests to verify constraints such as a unique value check and that no value is NULL.
2.2. Open my_first_dbt_model.sql file from the same folder and have a look at the SQL code. In the first line of the model’s script, you could override the project
configuration and personalize the model configuration. In this case this model will be materialized as a table instead of a view. After that a model is based on a SELECT statement over the source data, in this particular case it uses a CTE to create some sample data. But you could just write a query that uses the connector to bring data from the data warehouse.
2.3. Have a look at another example of the model:
SELECT
     as employee_key,
    employees.lastName as employee_last_name,
    employees.firstName as employee_first_name,
    employees.jobTitle as job_title,
    employees.email as email
FROM classicmodels.employees
This is an example of a model based on the Employees’ table in classicmodels. Here you are using the function generate_surrogate_key from dbt_utils to create a surrogate key based on the natural key employeeNumber. This is a good practice in data modeling because natural keys in your production data might change, or they could cause issues with your data models. For that reason, it is better to substitute natural keys and to perform the joins between dimension tables and fact tables with surrogate keys.
2.4. Now that you have familiarized yourself with the examples, create two new subfolders in the models folder inside the project: star_schema and obt. You can also delete the example subfolder.
mkdir -p models/star_schema
mkdir -p models/obt
rm -rf models/example
3 - Star Schema
3.1 - Description of the Approach
A star schema is composed of fact tables (containing an identifier, numerical measures and foreign keys) and dimensional tables. You are going to expand upon the star schema you used back in Course 1 Week 2 and implement the improved star schema as a dbt model in the project.
Let’s remember the Entity Relationship Diagram (ERD) for classicmodels:
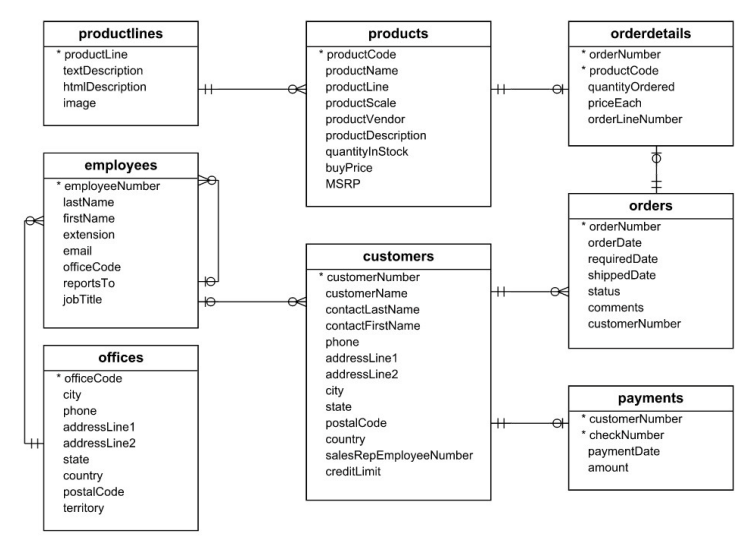
Verify the tables are loaded into the source database in Postgres:
%%sql
SELECT * FROM information_schema.tables
WHERE table_schema = 'classicmodels'
 * postgresql+psycopg2://postgresuser:***@de-c4w1a1-rds.cnyk6684iouz.us-east-1.rds.amazonaws.com:5432/postgres
8 rows affected.
| table_catalog | table_schema | table_name | table_type | self_referencing_column_name | reference_generation | user_defined_type_catalog | user_defined_type_schema | user_defined_type_name | is_insertable_into | is_typed | commit_action |
|---|---|---|---|---|---|---|---|---|---|---|---|
| postgres | classicmodels | employees | BASE TABLE | None | None | None | None | None | YES | NO | None |
| postgres | classicmodels | offices | BASE TABLE | None | None | None | None | None | YES | NO | None |
| postgres | classicmodels | customers | BASE TABLE | None | None | None | None | None | YES | NO | None |
| postgres | classicmodels | orderdetails | BASE TABLE | None | None | None | None | None | YES | NO | None |
| postgres | classicmodels | productlines | BASE TABLE | None | None | None | None | None | YES | NO | None |
| postgres | classicmodels | products | BASE TABLE | None | None | None | None | None | YES | NO | None |
| postgres | classicmodels | orders | BASE TABLE | None | None | None | None | None | YES | NO | None |
| postgres | classicmodels | payments | BASE TABLE | None | None | None | None | None | YES | NO | None |
You will follow the four steps proposed in the book The Data Warehouse Toolkit by Ralph Kimball and Margy Ross. The steps are the following:
- Select the Business process.
- Declare the Granularity of your data.
- Identify the Dimensions Tables.
- Identify the Facts.
Let’s briefly describe each of those steps:
Select the Business process
The original ERM of the classicmodels database is where the company, a specialist retailer in scale model toys, draws its data from. The most important business activity for this company is the sales of their products captured in the orders placed by customers, the business process you will model.
Declare the Granularity of your data
Each order contains some details that appear in the orderdetails table. A customer can place an order for one or more product items. The orderNumber field in the orderdetails table together with the productCode links a product to the order; and the granularity of your model would allow access to product information for each item on that order.
Identify the dimensions
It is important for a business to hold information about its customers, and the employees who serve the customer, their branches/offices and the products sold. These data would shed insights into the business’s performance. So, let’s create dimensions tables in your start schema with those aspects:
- Customers Dimension
- Employees Dimension
- Offices Dimension
- Products Dimension
Identify the Facts
For each order placed by a customer, the unit price and quantity of a product ordered are important as they are used to calculate the sale total of this single order. Hence, this information from the orderdetails table should be included as facts in the fact table.
Under the considerations stated in the four-step process to develop the star schema the idea is that you will implement the following model to your data:
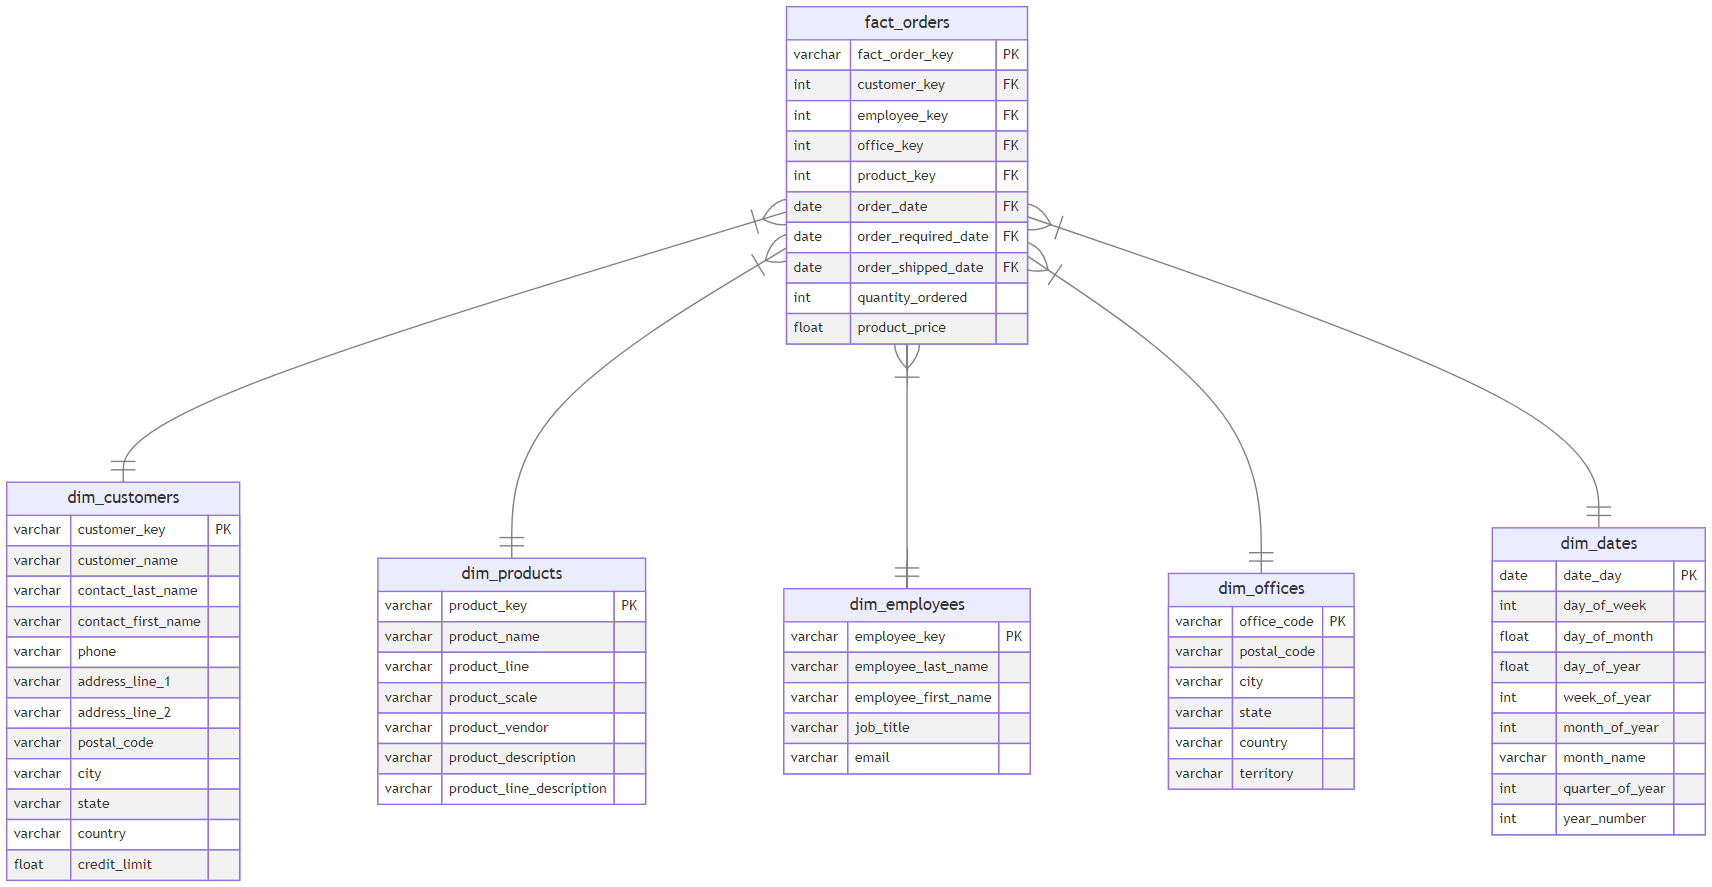
In this star schema, you have identified the orders table and order details as the primary tables for modeling, as they contain a business-critical process that involves facts such as transaction amounts and quantities. The dimensional tables related to the fact table are customers, products, employees and offices. You can examine and perform aggregations to the fact table on either or multiples of these dimensions.
Now, it’s your turn to implement the proposed data model.
3.2 - Creating the Facts Table
3.2.1. Review the query that extracts the data for the fact table.
%%sql
SELECT
    orders.orderNumber, orderdetails.orderLineNumber,
    customers.customerNumber AS customer_key,
    employees.employeeNumber AS employee_key,
    offices.officeCode AS office_key,
    productCode AS product_key,
    orders.orderDate AS order_date,
    orders.requiredDate AS order_required_date,
    orders.shippedDate AS order_shipped_date,
    orderdetails.quantityOrdered AS quantity_ordered,
    orderdetails.priceEach AS product_price
FROM classicmodels.orders
JOIN classicmodels.orderdetails ON orders.orderNumber = orderdetails.orderNumber
JOIN classicmodels.customers ON orders.customerNumber = customers.customerNumber
JOIN classicmodels.employees ON customers.salesRepEmployeeNumber = employees.employeeNumber
JOIN classicmodels.offices ON employees.officeCode = offices.officeCode
LIMIT 5
 * postgresql+psycopg2://postgresuser:***@de-c4w1a1-rds.cnyk6684iouz.us-east-1.rds.amazonaws.com:5432/postgres
5 rows affected.
| ordernumber | orderlinenumber | customer_key | employee_key | office_key | product_key | order_date | order_required_date | order_shipped_date | quantity_ordered | product_price |
|---|---|---|---|---|---|---|---|---|---|---|
| 10100 | 3 | 363 | 1216 | 2 | S18_1749 | 2003-01-06 00:00:00 | 2003-01-13 00:00:00 | 2003-01-10 00:00:00 | 30 | 136 |
| 10100 | 2 | 363 | 1216 | 2 | S18_2248 | 2003-01-06 00:00:00 | 2003-01-13 00:00:00 | 2003-01-10 00:00:00 | 50 | 55.09 |
| 10100 | 4 | 363 | 1216 | 2 | S18_4409 | 2003-01-06 00:00:00 | 2003-01-13 00:00:00 | 2003-01-10 00:00:00 | 22 | 75.46 |
| 10100 | 1 | 363 | 1216 | 2 | S24_3969 | 2003-01-06 00:00:00 | 2003-01-13 00:00:00 | 2003-01-10 00:00:00 | 49 | 35.29 |
| 10101 | 4 | 128 | 1504 | 7 | S18_2325 | 2003-01-09 00:00:00 | 2003-01-18 00:00:00 | 2003-01-11 00:00:00 | 25 | 108.06 |
3.2.2. Now you will need to create the dbt model for the fact_orders table. Open the ./classicmodels_modeling/dbt_project.yml file and paste the following in the new line after version: '1.0.0':
vars:
  source_schema: classicmodels
  star_schema: classicmodels_star_schema
  surrogate_key_treat_nulls_as_empty_strings: true
  "dbt_date:time_zone": "America/Los_Angeles"
This is for creation of some variables that can be used throughout your dbt models during compilation.
3.2.3. Find the key classicmodels_modeling at the end of the file (nested under the models key). Delete the nested key example, which is the following two lines:
    example:
      +materialized: view
Then add the following nested key instead:
    star_schema:
      +materialized: table
      +schema: star_schema
Save changes.
3.2.4. Go to the folder ./classicmodels_modeling/models/star_schema/ (which was created at step 2.4) and create an SQL file named fact_orders.sql.
3.2.5 Copy the previous query for the fact table (without the %%sql and LIMIT clause) and paste it into a new file located at fact_orders.sql. Make the following changes:
- Replace every appearance of
classicmodelswith `` (in 5 places). Each table reference in your query should now be in the format.<TABLE_NAME>. This will use jinja templating to dynamically replacesource_schemawith the actual schema name, which is currentlyclassicmodels. - Replace the default key columns with surrogate keys using the `` function. This function accepts an array of column names to generate the surrogate keys:
- Replace
orders.orderNumber, orderdetails.orderLineNumberwith ` as fact_order_key`. - Replace
Replace customers.customerNumber with:with ``. - Do the same for
employees.employeeNumber,offices.officeCodeandproductCode.
- Replace
Save changes.
3.2.6. Copy the file located at ./scripts/schema.yml into ./classicmodels_modeling/models/star_schema/ folder:
cp ../scripts/schema.yml ./models/star_schema/schema.yml
Open the schema.yml file. You will see that it is partially filled for you with the schema definition for the fact_orders and dim_customers tables.
With that, you have created the model for the fact table fact_orders. Before you run the model against the database to create the tables, you need to create the dimension tables. The process to create the models for the dimension tables will be similar to what you did.
3.3 - Creating the Customers Dimension Table
3.3.1. Here is the query to create the dimension table dim_customers. The complete output has 122 rows, you will use LIMIT to avoid extracting too many rows in the preview.
%%sql
SELECT
    customerNumber as customer_key,
    customerName as customer_name,
    contactLastName as customer_last_name,
    contactFirstName as customer_first_name,
    phone as phone,
    addressLine1 as address_line_1,
    addressLine2 as address_line_2,
    postalCode as postal_code,
    city as city,
    state as state,
    country as country,
    creditLimit as credit_limit
FROM classicmodels.customers
LIMIT 5
 * postgresql+psycopg2://postgresuser:***@de-c4w1a1-rds.cnyk6684iouz.us-east-1.rds.amazonaws.com:5432/postgres
5 rows affected.
| customer_key | customer_name | customer_last_name | customer_first_name | phone | address_line_1 | address_line_2 | postal_code | city | state | country | credit_limit |
|---|---|---|---|---|---|---|---|---|---|---|---|
| 103 | Atelier graphique | Schmitt | Carine | 40.32.2555 | 54, rue Royale | None | 44000 | Nantes | None | France | 21000 |
| 112 | Signal Gift Stores | King | Jean | 7025551838 | 8489 Strong St. | None | 83030 | Las Vegas | NV | USA | 71800 |
| 114 | Australian Collectors, Co. | Ferguson | Peter | 03 9520 4555 | 636 St Kilda Road | Level 3 | 3004 | Melbourne | Victoria | Australia | 117300 |
| 119 | La Rochelle Gifts | Labrune | Janine | 40.67.8555 | 67, rue des Cinquante Otages | None | 44000 | Nantes | None | France | 118200 |
| 121 | Baane Mini Imports | Bergulfsen | Jonas | 07-98 9555 | Erling Skakkes gate 78 | None | 4110 | Stavern | None | Norway | 81700 |
Follow the same process to create this part in the model.
3.3.2. Go to the folder ./classicmodels_modeling/models/star_schema/ and create an SQL file dim_customers.sql.
3.3.3. Copy the previous query without the %%sql and LIMIT clause, paste it into the new file dim_customers.sql. Make the following changes in the file:
- Replace
classicmodelswith `` (in 1 place). The table reference now is in the format.<TABLE_NAME>. - Replace
customerNumberwith `` to generate the surrogate key.
Save changes.
3.3.4. Remember that the schema.yml file has been already configured for the dim_customers table, but notice that for this table, you will find the following:
- name: customer_key
    description: The primary key for this table
    data_tests:
      - unique
      - not_null
This is the syntax to create tests over your columns. You will use this later.
3.4 - Creating the Employees Dimension Table
3.4.1. Here is the query to create the dimension table dim_employees. You will use a LIMIT to avoid extracting too many rows. The complete output has 23 rows.
%%sql
SELECT
    employeeNumber as employee_key,
    lastName as employee_last_name,
    firstName as employee_first_name,
    jobTitle as job_title,
    email as email
FROM classicmodels.employees
LIMIT 5
3.4.2. Go to the folder ./classicmodels_modeling/models/star_schema/ and create an SQL file dim_employees.sql.
3.4.3. Copy the previous query without the %%sql and LIMIT clause, and paste it into the new file dim_employees.sql. Make the following changes in the file:
- Replace
classicmodelswith `` (in 1 place). - Replace
employeeNumberwith `` to generate the surrogate key.
Save changes.
3.4.4. Open the schema.yml file and based on the dim_customers schema, create the schema for the dim_employees table. The employee_key should be the primary key for this table, so you can set the same tests as in dim_customers. Make sure to use the appropriate column names.
3.5 - Creating the Office Dimension Table
3.5.1. This is the query to create the dimension table dim_offices.
%%sql
SELECT
    officeCode as office_key,
    postalCode as postal_code,
    city as city,
    state as state,
    country as country,
    territory as territory
FROM classicmodels.offices
 * postgresql+psycopg2://postgresuser:***@de-c4w1a1-rds.cnyk6684iouz.us-east-1.rds.amazonaws.com:5432/postgres
7 rows affected.
| office_key | postal_code | city | state | country | territory |
|---|---|---|---|---|---|
| 1 | 94080 | San Francisco | CA | USA | NA |
| 2 | 02107 | Boston | MA | USA | NA |
| 3 | 10022 | NYC | NY | USA | NA |
| 4 | 75017 | Paris | None | France | EMEA |
| 5 | 102-8578 | Tokyo | Chiyoda-Ku | Japan | Japan |
| 6 | 2010 | Sydney | NSW | Australia | APAC |
| 7 | EC2N 1HN | London | None | UK | EMEA |
3.5.2. Go to the folder ./classicmodels_modeling/models/star_schema/ and create an SQL file dim_offices.sql.
3.5.3. Copy the previous query, paste it into the new file dim_offices.sql. Make the following changes in the file:
- Replace
classicmodelswith `` (in 1 place). - Replace
officeCodewith `` to generate the surrogate key.
Save changes.
3.5.4. Open the schema.yml file and based on the dim_customers schema, create the schema for the dim_offices table. The office_key should be the primary key for this table, so you can set the same tests as in dim_customers. Make sure to use the appropriate column names.
3.6 - Creating the Product Dimension Table
3.6.1. This is the query to create the dimension table dim_products. Use LIMIT as the total output has 110 rows.
%%sql
SELECT
    productCode as product_key,
    productName as product_name,
    products.productLine as product_line,
    productScale as product_scale,
    productVendor as product_vendor,
    productDescription as product_description,
    textDescription as product_line_description
FROM classicmodels.products
JOIN classicmodels.productlines ON products.productLine=productlines.productLine
LIMIT 3
 * postgresql+psycopg2://postgresuser:***@de-c4w1a1-rds.cnyk6684iouz.us-east-1.rds.amazonaws.com:5432/postgres
3 rows affected.
| product_key | product_name | product_line | product_scale | product_vendor | product_description | product_line_description |
|---|---|---|---|---|---|---|
| S10_1678 | 1969 Harley Davidson Ultimate Chopper | Motorcycles | 1:10 | Min Lin Diecast | This replica features working kickstand, front suspension, gear-shift lever, footbrake lever, drive chain, wheels and steering. All parts are particularly delicate due to their precise scale and require special care and attention. | Our motorcycles are state of the art replicas of classic as well as contemporary motorcycle legends such as Harley Davidson, Ducati and Vespa. Models contain stunning details such as official logos, rotating wheels, working kickstand, front suspension, gear-shift lever, footbrake lever, and drive chain. Materials used include diecast and plastic. The models range in size from 1:10 to 1:50 scale and include numerous limited edition and several out-of-production vehicles. All models come fully assembled and ready for display in the home or office. Most include a certificate of authenticity. |
| S10_1949 | 1952 Alpine Renault 1300 | Classic Cars | 1:10 | Classic Metal Creations | Turnable front wheels; steering function; detailed interior; detailed engine; opening hood; opening trunk; opening doors; and detailed chassis. | Attention car enthusiasts: Make your wildest car ownership dreams come true. Whether you are looking for classic muscle cars, dream sports cars or movie-inspired miniatures, you will find great choices in this category. These replicas feature superb attention to detail and craftsmanship and offer features such as working steering system, opening forward compartment, opening rear trunk with removable spare wheel, 4-wheel independent spring suspension, and so on. The models range in size from 1:10 to 1:24 scale and include numerous limited edition and several out-of-production vehicles. All models include a certificate of authenticity from their manufacturers and come fully assembled and ready for display in the home or office. |
| S10_2016 | 1996 Moto Guzzi 1100i | Motorcycles | 1:10 | Highway 66 Mini Classics | Official Moto Guzzi logos and insignias, saddle bags located on side of motorcycle, detailed engine, working steering, working suspension, two leather seats, luggage rack, dual exhaust pipes, small saddle bag located on handle bars, two-tone paint with chrome accents, superior die-cast detail , rotating wheels , working kick stand, diecast metal with plastic parts and baked enamel finish. | Our motorcycles are state of the art replicas of classic as well as contemporary motorcycle legends such as Harley Davidson, Ducati and Vespa. Models contain stunning details such as official logos, rotating wheels, working kickstand, front suspension, gear-shift lever, footbrake lever, and drive chain. Materials used include diecast and plastic. The models range in size from 1:10 to 1:50 scale and include numerous limited edition and several out-of-production vehicles. All models come fully assembled and ready for display in the home or office. Most include a certificate of authenticity. |
3.6.2. Create an SQL file dim_products.sql in the folder ./classicmodels_modeling/models/star_schema/.
3.6.3. Copy the previous query, paste it into the new file dim_products.sql. Make the following changes in the file:
- Replace
classicmodelswith `` (in 2 places). - Replace
productCodewith `` to generate the surrogate key.
Save changes.
3.6.4. Open the schema.yml file and based on the dim_customers schema, create the schema for the dim_products table. The product_key should be the primary key for this table, so you can set the same tests as in dim_customers. Make sure to use the appropriate column names.
3.7 - Creating the Date Dimension Table
As you may know, time is one of the most important dimensions in star schemas, for this case, you will limit the time dimension to the dates that appear in the orders table. Generating this dimension can be cumbersome, so you are going to make use of the dbt_date package to generate the date dimension.
3.7.1. Create a dates.sql model file in the ./classicmodels_modeling/models/star_schema/ folder.
3.7.2. Inside of it, add the line to call the get_date_dimension function from the dbt_date package. This function takes an initial and final date, for classicmodels the dates are between the start of 2003 and the end of 2005. Here is the format of the function call:
3.7.3. Create a dim_dates.sql model file in the ./classicmodels_modeling/models/star_schema/ folder.
3.7.4. In dim_dates.sql write the following SQL query to select required columns from the date_dimension model:
SELECT
    date_day,
    day_of_week,
    day_of_month,
    day_of_year,
    week_of_year,
    month_of_year,
    month_name,
    quarter_of_year,
    year_number
FROM
    date_dimension d
To access the date model, add a CTE statement prior to that SELECT statement (at the start of the file):
with date_dimension as (
    select * from
)
Save changes to the file.
3.7.5. Open the schema.yml file and add the following schema for the dim_dates table:
  - name: dim_dates
    columns:
      - name: date_day
        description: The primary key for this table
        data_tests:
          - unique
          - not_null
      - name: day_of_week
      - name: day_of_month
      - name: day_of_year
      - name: week_of_year
      - name: month_of_year
      - name: month_name
      - name: quarter_of_year
      - name: year_number
3.8 - Running the Star Schema Model
Once you have created all the models for your star schema, it is time to run dbt against your database to create the proposed star schema.
3.8.1. In the Cloud9 terminal where you have activated the Python environment, make sure to set the dbt project folder as your working directory:
cd /home/ec2-user/environment/classicmodels_modeling
3.8.2. Once you are in the ~/environment/classicmodels_modeling folder in Cloud9 terminal, then run dbt with the following command:
dbt run -s star_schema
This should run your models and perform the creation and population of the tables in a new database named classicmodels_star_schema that resides in the same RDS server. Given that you are going to create several models with dbt, the -s (or --select) option allows you to select the particular data model that you want to run.
3.8.7. Now, it is time to check if the tables were created and populated. Run the next cell to change the connection to the classicmodels_star_schema database:
%%sql
SELECT * FROM information_schema.tables
WHERE table_schema = 'classicmodels_star_schema'
 * postgresql+psycopg2://postgresuser:***@de-c4w1a1-rds.cnyk6684iouz.us-east-1.rds.amazonaws.com:5432/postgres
7 rows affected.
| table_catalog | table_schema | table_name | table_type | self_referencing_column_name | reference_generation | user_defined_type_catalog | user_defined_type_schema | user_defined_type_name | is_insertable_into | is_typed | commit_action |
|---|---|---|---|---|---|---|---|---|---|---|---|
| postgres | classicmodels_star_schema | dim_customers | BASE TABLE | None | None | None | None | None | YES | NO | None |
| postgres | classicmodels_star_schema | dim_employees | BASE TABLE | None | None | None | None | None | YES | NO | None |
| postgres | classicmodels_star_schema | dim_offices | BASE TABLE | None | None | None | None | None | YES | NO | None |
| postgres | classicmodels_star_schema | dim_products | BASE TABLE | None | None | None | None | None | YES | NO | None |
| postgres | classicmodels_star_schema | fact_orders | BASE TABLE | None | None | None | None | None | YES | NO | None |
| postgres | classicmodels_star_schema | dates | BASE TABLE | None | None | None | None | None | YES | NO | None |
| postgres | classicmodels_star_schema | dim_dates | BASE TABLE | None | None | None | None | None | YES | NO | None |
And count the number of rows in each table to verify that they were populated:
%sql SELECT count(*) FROM classicmodels_star_schema.fact_orders;
 * postgresql+psycopg2://postgresuser:***@de-c4w1a1-rds.cnyk6684iouz.us-east-1.rds.amazonaws.com:5432/postgres
1 rows affected.
| count |
|---|
| 2996 |
Expected Output
| count |
|---|
| 2996 |
%sql SELECT count(*) FROM classicmodels_star_schema.dim_customers;
 * postgresql+psycopg2://postgresuser:***@de-c4w1a1-rds.cnyk6684iouz.us-east-1.rds.amazonaws.com:5432/postgres
1 rows affected.
| count |
|---|
| 122 |
Expected Output
| count |
|---|
| 122 |
%sql SELECT count(*) FROM classicmodels_star_schema.dim_employees;
 * postgresql+psycopg2://postgresuser:***@de-c4w1a1-rds.cnyk6684iouz.us-east-1.rds.amazonaws.com:5432/postgres
1 rows affected.
| count |
|---|
| 23 |
Expected Output
| count |
|---|
| 23 |
%sql SELECT count(*) FROM classicmodels_star_schema.dim_offices;
 * postgresql+psycopg2://postgresuser:***@de-c4w1a1-rds.cnyk6684iouz.us-east-1.rds.amazonaws.com:5432/postgres
1 rows affected.
| count |
|---|
| 7 |
Expected Output
| count |
|---|
| 7 |
%sql SELECT count(*) FROM classicmodels_star_schema.dim_products;
 * postgresql+psycopg2://postgresuser:***@de-c4w1a1-rds.cnyk6684iouz.us-east-1.rds.amazonaws.com:5432/postgres
1 rows affected.
| count |
|---|
| 110 |
Expected Output
| count |
|---|
| 110 |
%sql SELECT count(*) FROM classicmodels_star_schema.dim_dates;
 * postgresql+psycopg2://postgresuser:***@de-c4w1a1-rds.cnyk6684iouz.us-east-1.rds.amazonaws.com:5432/postgres
1 rows affected.
| count |
|---|
| 1095 |
Expected Output
| count |
|---|
| 1095 |
4 - One Big Table (OBT)
As the name suggests, it means a large table containing all the relevant data needed for analysis. It is similar to a fact table, but instead of using dimensional tables and foreign keys, it contains the required dimensional values for each row within. This approach ensures the data warehouse doesn’t have to perform any joins to query the relevant data each time you need it. Here is an example of an OBT table focused on the orders of classicmodels:
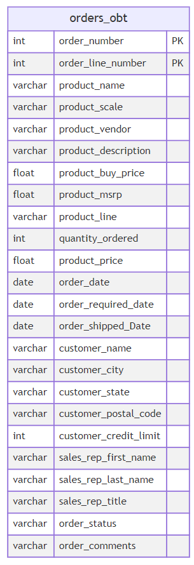
4.1. Create the file orders_obt.sql in the ./classicmodels_modeling/models/obt/ folder. Here is the SQL query to which you need to apply jinja templating like you did in Section 3. No need to create any keys there.
%%sql
SELECT
    orderdetails.orderNumber as order_number,
    orderdetails.orderLineNumber as order_line_number,
    products.productName as product_name,
    products.productScale as product_scale,
    products.productVendor as product_vendor,
    products.productDescription as product_description,
    products.buyPrice as product_buy_price,
    products.MSRP as product_msrp,
    productlines.textDescription as product_line,
    orderdetails.quantityOrdered as quantity_ordered,
    orderdetails.priceEach as product_price,
    orders.orderDate as order_date,
    orders.requiredDate as order_required_date,
    orders.shippedDate as order_shipped_date,
    customers.customerName as customer_name,
    customers.city as customer_city,
    customers.state as customer_state,
    customers.postalCode as customer_postal_code,
    customers.creditLimit as customer_credit_limit,
    employees.firstName as sales_rep_first_name,
    employees.lastName as sales_rep_last_name,
    employees.jobTitle as sales_rep_title,
    orders.status as order_status,
    orders.comments as order_comments
FROM classicmodels.orderdetails
JOIN classicmodels.orders ON orderdetails.orderNumber =  orders.orderNumber
JOIN classicmodels.products ON orderdetails.productCode =  products.productCode
JOIN classicmodels.productlines ON products.productLine =  productlines.productLine
JOIN classicmodels.customers ON orders.customerNumber =  customers.customerNumber
JOIN classicmodels.employees ON customers.salesRepEmployeeNumber =  employees.employeeNumber
LIMIT 2
 * postgresql+psycopg2://postgresuser:***@de-c4w1a1-rds.cnyk6684iouz.us-east-1.rds.amazonaws.com:5432/postgres
2 rows affected.
| order_number | order_line_number | product_name | product_scale | product_vendor | product_description | product_buy_price | product_msrp | product_line | quantity_ordered | product_price | order_date | order_required_date | order_shipped_date | customer_name | customer_city | customer_state | customer_postal_code | customer_credit_limit | sales_rep_first_name | sales_rep_last_name | sales_rep_title | order_status | order_comments |
|---|---|---|---|---|---|---|---|---|---|---|---|---|---|---|---|---|---|---|---|---|---|---|---|
| 10100 | 3 | 1917 Grand Touring Sedan | 1:18 | Welly Diecast Productions | This 1:18 scale replica of the 1917 Grand Touring car has all the features you would expect from museum quality reproductions: all four doors and bi-fold hood opening, detailed engine and instrument panel, chrome-look trim, and tufted upholstery, all topped off with a factory baked-enamel finish. | 86.7 | 170 | Our Vintage Car models realistically portray automobiles produced from the early 1900s through the 1940s. Materials used include Bakelite, diecast, plastic and wood. Most of the replicas are in the 1:18 and 1:24 scale sizes, which provide the optimum in detail and accuracy. Prices range from $30.00 up to $180.00 for some special limited edition replicas. All models include a certificate of authenticity from their manufacturers and come fully assembled and ready for display in the home or office. | 30 | 136 | 2003-01-06 00:00:00 | 2003-01-13 00:00:00 | 2003-01-10 00:00:00 | Online Diecast Creations Co. | Nashua | NH | 62005 | 114200 | Steve | Patterson | Sales Rep | Shipped | None |
| 10100 | 2 | 1911 Ford Town Car | 1:18 | Motor City Art Classics | Features opening hood, opening doors, opening trunk, wide white wall tires, front door arm rests, working steering system. | 33.3 | 60.54 | Our Vintage Car models realistically portray automobiles produced from the early 1900s through the 1940s. Materials used include Bakelite, diecast, plastic and wood. Most of the replicas are in the 1:18 and 1:24 scale sizes, which provide the optimum in detail and accuracy. Prices range from $30.00 up to $180.00 for some special limited edition replicas. All models include a certificate of authenticity from their manufacturers and come fully assembled and ready for display in the home or office. | 50 | 55.09 | 2003-01-06 00:00:00 | 2003-01-13 00:00:00 | 2003-01-10 00:00:00 | Online Diecast Creations Co. | Nashua | NH | 62005 | 114200 | Steve | Patterson | Sales Rep | Shipped | None |
4.2. Create the schema.yml file in the ./classicmodels_modeling/models/obt/ folder and develop the appropriate schemas for the orders_obt table. For now, you don’t need to add the tests for the primary key, just make sure to list the names of the columns in the schema file. You will add the required test in the next section.
4.3. Open the ./classicmodels_modeling/dbt_project.yml file, at the end of it, under the classicmodels_modeling key (which is nested inside the models key), add the following lines:
    obt:
      +materialized: table
      +schema: obt
Save changes.
4.4. Make sure you are in the ~/environment/classicmodels_modeling folder in Cloud9 terminal. Run the following command:
dbt run --select "obt"
4.5. Once you run the dbt run statement, verify that the tables exist and do a record count for each table:
%%sql
SELECT * FROM information_schema.tables
WHERE table_schema = 'classicmodels_obt'
 * postgresql+psycopg2://postgresuser:***@de-c4w1a1-rds.cnyk6684iouz.us-east-1.rds.amazonaws.com:5432/postgres
1 rows affected.
| table_catalog | table_schema | table_name | table_type | self_referencing_column_name | reference_generation | user_defined_type_catalog | user_defined_type_schema | user_defined_type_name | is_insertable_into | is_typed | commit_action |
|---|---|---|---|---|---|---|---|---|---|---|---|
| postgres | classicmodels_obt | orders_obt | BASE TABLE | None | None | None | None | None | YES | NO | None |
%sql SELECT count(*) FROM classicmodels_obt.orders_obt;
 * postgresql+psycopg2://postgresuser:***@de-c4w1a1-rds.cnyk6684iouz.us-east-1.rds.amazonaws.com:5432/postgres
1 rows affected.
| count |
|---|
| 2996 |
Expected Output
| count |
|---|
| 2996 |
5 - Performing Tests over the Data in the New Models
You can perform some tests over the data that was populated in your new star schema model. In the schema.yml file you have the definition for each model and each column. You can place certain tests at the column level or at the table level. As an example of tests at the table level, you could define the following one for the orders_obt table:
- name: orders_obt
  description: "Orders OBT"
  columns:
    ...
  data_tests:
    - dbt_utils.unique_combination_of_columns:
        combination_of_columns:
        - order_number
        - order_line_number
Note: The indentation in .yml files is crucial for the correct interpretation of the file. Ensure that the indentation levels are consistent to avoid errors in processing the YAML file.
This test verifies that the combination of columns that form the primary key is unique. Note that this primary key is composed by a combination of 2 columns. To check for the primary key on other tables that are non composed keys, you can define the test at the column level, such as:
- name: dim_customers
  description: "Customer dimension"
  columns:
    - name: customer_key
      description: The primary key for this table
      data_tests:
        - unique
        - not_null
Add those tests to your model and run the dbt test command to check them:
dbt test -s obt
In this lab, you have learned about dbt and further your experience with data modeling, each data model has its advantages and setbacks and should be used based on the business and analytical requirements. OBT performs faster in terms of data retrieval speed when compared against a star schema, however updating OBT could be much more complex and a star schema is better in terms of conceptualizing and sharing your data while requiring less storage space.
6 - Upload Files for Grading
Upload the notebook into S3 bucket for grading purposes. To do this, run the following commands in the terminal.
Note: you may need to click Save button before the upload.
AWS_ACCOUNT_ID=$(aws sts get-caller-identity --query Account --output text)
aws s3 cp /home/ec2-user/environment/C4_W1_Assignment.ipynb s3://de-c4w1a1-${AWS_ACCOUNT_ID}-us-east-1-submission/C4_W1_Assignment_Learner.ipynb